


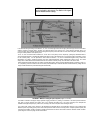

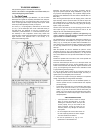

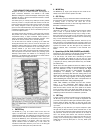
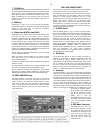

2. Mounting the Viewfinder
Each 7", 8", 10", and 12" LX200 telescope is supplied as
standard
equipment with an 8x50mm straight-through
viewfinder. The
bracket for this viewfinder is packed separately from the finder
itself, and 6 black nylon thumbscrews for Collimation are pre-
threaded into the viewfinder bracket. The viewfinder bracket
mounts onto the telescope with a quick-release mount. See Fig. 1.
a. Attaching the Viewfinder
The viewfinder is shipped separately from the bracket and must be
installed into the bracket. Slide the viewfinder into the bracket and
lightly tighten the 6 Collimation (alignment) screws (2, Fig. 1).
The quick-release mount allows the viewfinder to be easily
attached or removed from the telescope. To attach the unit, simply
slide the viewfinder with bracket into the mating base on the
telescope and tighten the two thumbscrews.
b. Focusing the Viewfinder
The viewfinder has been pre-focused at the factory. However,
should it become necessary to adjust the focus, follow these
steps:
1. Loosen the focus lock ring (18, Fig. 1).
2. While looking at a star, rotate the Dew Shield (1, Fig. 1) until
the star is in focus. (This refocuses the objective lens.)
CAUTION: Take care when rotating counter clockwise.
You are unthreading the dew shield and it may fall off if
rotated too far. Refocusing the objective lens will only
require a few turns of the Dew Shield at most.
3. When the Dew Shield is rotated to the sharpest focus for your
eye, tighten the focus lock ring against the Dew Shield to fix
its position.
c. Collimating the Viewfinder
The viewfinder will require alignment, or Collimation, with the main
telescope. Using the 26mm eyepiece, point the main telescope at
some easy to find land object (e.g., the top of a telephone pole or
corner of a building) at least 200 yards distant. Center a well-
defined object in the main telescope. Then, simply turn the 6
nylon Collimation thumbscrews (2, Fig. 1) until the crosshairs of
the viewfinder are precisely centered on the object already
centered in the main telescope. With this Collimation
accomplished, objects located first in the wide-field viewfinder will
then be centered in the main telescope's field of view.
3. Attaching the Diagonal Mirror and Eyepiece
The eyepiece holder (6, Fig. 1) threads directly onto the rear-cell
thread of the 8" and 10" telescopes. The diagonal prism (13, Fig.
1) slides into the eyepiece holder of the 7", 8" and 10" telescopes,
while the 2" diagonal mirror threads directly into the rear-cell
thread of the 12" telescope. In turn, both the diagonal prism and
diagonal mirror accept the supplied 1-1/4" O.D. eyepiece.
For astronomical observations, the diagonal prism or mirror
generally provides a more comfortable right-angle viewing
position. Alternately, in the 8" and 10" telescopes, an eyepiece
may be inserted directly into the eyepiece holder for straight-
through observations, the 12" telescope requires the accessory
eyepiece holder. Note in this case, however, that the image will
appear inverted and reversed left-for-right. With the diagonal prism
and mirror, telescopic images appear correctly oriented up-and-
down, but still reversed left-for-right. For terrestrial applications,
where a fully corrected image orientation is desired, both up-and-
down and left-for-right, the optional #924 Erecting Prism* or #928
45° Erect-Image Diagonal Prism should be ordered separately.
Eyepieces and the diagonal prism are held in their respective
places on the telescope by a moderate tightening of the
thumbscrews on the diagonal prism and eyepiece holder.
4. Checking the Collimation of the Optics
The optical systems of all Meade Schmidt-Cassegrains are
precisely collimated, or aligned, before leaving the factory.
However, if the telescope has received a severe jolt in shipment
the optics can become de-collimated, a situation which may result
in serious image degradation. Recollimating the optics is,
however, a simple procedure which is easily performed by the
telescope user. We urge all LX200 owners to confirm the
Collimation of their telescope, and to recollimate the optics if
necessary. For details in this regard, see page 82.
NOTE: There is no Collimation procedure required for the
Meade 7" Maksutov-Cassegrain telescope. Factory alignment
assures optimal viewing accuracies.
5. 12" Tube Swing-Through Limit
The length of the 12" LX200 optical tube prohibits the correcting
plate end of the tube from swinging through the fork arms — the
tube will hit the mount. When the telescope is aligned, the
software will stop the telescope from moving into the mount. If the
telescope is not aligned, there are also mechanical stops.
When in LAND or ALTAZ modes, this limit does not restrict any
sections of the sky, since the limit is set at 45° from straight down.
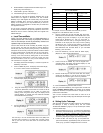
When in the POLAR mode, some parts of the sky might be
restricted, depending on the latitude of the observing site.
Observing sites with latitudes higher than 45° will not have any
restrictions. Latitudes below 45° will have the southern horizon
restricted somewhat. To determine the amount of sky not
available, subtract the latitude of the observing site from 45. This
will give the number of degrees of southern horizon that the 12"
LX200 will not move to. For example, if the latitude of the
observing site is 35°, then 10° (45-35) of southern sky is
unavailable for observations.
6. 7" Tube Swing-Through Limit
The length of the 7" LX200 optical tube prohibits the correcting
plate end of the tube from swinging through the fork arms — the
tube will hit the mount. When the telescope is aligned, the
software will stop the telescope from moving into the mount. If the
telescope is not aligned, there are also mechanical stops and
some parts of the sky might be restricted if using a wedge,
depending on the latitude of the observing site.
Observing sites with latitudes higher than 45° will not have any
restrictions. Latitudes below 45° will have the southern horizon
somewhat restricted when using a wedge and polar aligning. To
determine the amount of sky not available, subtract the latitude of
the observing site from 45, this will give the number of degrees of
the southern horizon that the 7" LX50 will not reach. For example,
if the latitude of the observing site is 35°, then 10° (45 - 35) of
southern sky is unavailable for observations. No restrictions of
observable sky occur in the altaz mode of alignment and
operation.
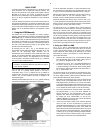
7. Maksutov Fan
The Maksutov optics are equipped with a fan which will assist
in the stabilization of the temperature of these optics. The fan
will operate when a special power cord (supplied in the
accessory box) is plugged into the fan and the LX50 panel plug
marked "Aux" with the power switch in the "ON" position. The
amount of time required to stabilize the temperature will be
dependent upon ambient conditions including the observation
site and preexisting condition of the telescope. The fan should
be activated at the beginning of the observation session to
accelerate the temperature stabilization. As soon as the optics
have reached an equilibrium with the environment the fan
should be turned off by unplugging the fan power cord. Fan
operation time should range between 5 and 25 minutes. While
it is permissible to run the fan continuously it is not
recommended because the very slight vibration of the fan may
cause noticeable movement of the objects observed in the
sensitive optics.
8