


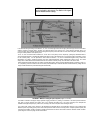

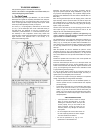


The LX200 can also be moved manually with the R.A. and Dec.
locks released, or as described above only. The Declination
manual slow-motion knob (1, Fig.4) is non-functional when power
is supplied to the telescope. When the power is "on",
only use the
N, S, E, and W keys on the keypad hand controller. Serious
damage can occur to the internal gears of the motor
assembly if
the Declination manual slow-motion knob is turned even a slight
amount by hand.
3. Using the LX200 In ALTAZ (Altazimuth )
The two quick start methods described above allow you to use
the
telescope, but do not make use of any of the computer features
available, including finding objects from the Object Library and
automatic tracking of stars. In order for these features to work, the
telescope's power needs to be "on," and the computer needs
some basic information, which is entered
through the keypad.
Once entered, the information is
permanently remembered by
the telescope's computer and need never be entered again, even if
the telescope is turned "on" and "off" many times.
This section will explain what keys to push to get the minimum
data
required into the computer, without any detailed
explanation (see
MODE FUNCTIONS, page 16, for detailed
instructions). The steps
detailed here only take a few minutes
and allow you to begin
making use of all the LX200 features.
a. Entering Basic Information
In order for the LX200 to make the conversions between the stellar
coordinate system (R.A. and Declination) and the Altazimuth
coordinate system (altitude and azimuth), it needs to know three
pieces of information. This information only needs to be entered
one time — the LX200 remembers data even when the power is
off. Note, however, that the time should be checked and reset, if
necessary, on each observing session.
b. Location of the Observing Site
NOTE: The SITE information cannot be entered if the telescope is
in LAND mode.
If the telescope is in LAND mode, the SITE menu option (Display 2)
will appear in lower case letters (see
Which Alignment
Method to Use?,
page 13). Follow steps 4 through 8 in
Setting Up
the Telescope,
page 11, to change the telescope's operation to
Altazimuth (ALTAZ) mode before proceeding.
You should find the position of your observing site to within 1 or
2
minutes of arc in both latitude and longitude. Many automobile,
pilot, and topographical maps, as well as most atlases show
latitude and longitude in 15 minute increments or better. The
accuracy of the LX200 will depend on how close you get, so take a
little time to get as accurate as you can.
Once the above information is determined, it can be entered into
the telescope. It is easiest to enter the data with the telescope
sitting on a table indoors—do not try to do it outside at night.
Each step below is given without any details or explanations to
keep the process as simple and fast as possible. Next to each step
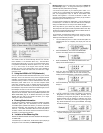
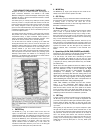
will also be a sample of what the keypad hand controller display (1,
Fig. 6) should look like after each step.
As an example, we will enter the data for Irvine, CA (LAT = 33°35',
LONG = 117°42'). If at any time you get "lost," simply turn off the
telescope and restart this procedure.
1. Turn the telescope power on. After a few seconds (after the
self-diagnostic test is complete), the display will look
like
Display 1.
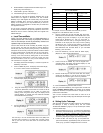
4. Press and Hold the ENTER key until the keypad hand
controller beeps. This selects the first site for editing. The
display should look like Display 4, with the first "A"
flashing.
6. Use the number keys to enter your latitude. The underline
designates the current cursor position. Mistakes can be
corrected by moving back (using the "E" and "W" keys). A
negative latitude can be entered by positioning the cursor
under the "+" and hitting the "NEXT" key (lower right-hand
key). When the latitude is correct, press ENTER. The
display
will look like Display 6.
10
2. Press the ENTER key. This selects the TELESCOPE
functions. The display should now look like Display 2.
3. Press the ENTER key. This selects the SITE functions. The
display should look like Display 3.
5. Press the ENTER key. The display should now look like
Display 5.
7. Use the number keys to enter your Longitude as above. When
complete, the display will look like Display 7.