


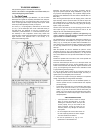

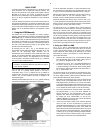

3. Loosen the R.A. lock (7, Fig. 1) and rotate the telescope so
that the R.A. pointer (9, Fig. 1) and the HA pointer (16, Fig. 1) are
approximately in line with each other. This
will position the fork arms
so that they are parallel to the power panel (11, Fig. 1). lock the R.A.
lock. Steps 2 and 3 are not required for the telescope to work, so
don't worry about getting it exactly right. The telescope has some
"illegal" positions (places where the telescope will not go) and these
two steps insure proper operation.
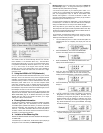
4. Turn the telescope on. After a few seconds (after the self-
diagnostic test is comolete). the disolav will look like
Display 15.
7. Press the ENTER key to select the ALIGN function. The
display will look like Display 18. (If the display looks like
Display 19 — with a checkmark already next to ALTAZ,
go
to step 9.)
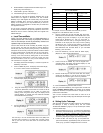
8. Press the ENTER key to activate the ALTAZ mode. The
keypad hand controller will beep and display a
checkmark
next to the ALTAZ (see Display 19).
11. If you have not already leveled the telescope, do so now.
When the telescope is level, press ENTER. The display will
look like Display 22.
13. Using the monthly star charts (APPENDIX B, page 29) pick
an
alignment star. Look at the chart for the current month and
face the direction indicated. The constellations shown are
easily found — even in the city. The charts are
approximately 90 degrees wide, with the top of the chart
indicating straight up. If the time is after 9:00 PM, then
use the next month's chart. Once you identify the
constellation, pick any of the labeled stars that is not within
a 10 degree radius of overhead, but do not choose Polaris,
for reasons made clear below. Polaris is also
known as the
North Star, and is shown for reference only.
When aligning in ALTAZ, overhead stars can confuse the
LX200 because of an illegal position that prevents the
optical
tube assembly from slewing past 90 degrees altitude to
protect the viewfinder from hitting the fork arm. The LX200
will track an overhead object, but it does so by moving
higher in altitude up to the illegal position, then the drive
speeds up and move 180 degrees in azimuth so that the
optical tube assembly can now be lowered in altitude to keep
up with the overhead object. Confusion arises because the
LX200 does not know which side of 180 degrees of azimuth
that it is on. Similarly, Polaris presents position problems in
ALTAZ alignment because it is so close to the North
Celestial Pole. In this region of the sky, the lines of Right
Ascension are so close together that even the LX200's
high-resolution encoders can yield ambiguous data.
In our example of August 5, we would use the August chart,
face North and look up about 45 degrees. Cygnus is
probably the easiest constellation to recognize, and we
will
use the star Deneb for our example.
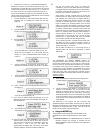
Use the PREV and NEXT key to scroll through the list of
alignment stars until the arrow is positioned on Deneb
(Display 24).
The TELESCOPE and OBJECT LIBRARY features are
accessed through a series of menus, which are shown on the
keypad hand controller display. You can scroll up or down through
the list of choices by using the PREV and NEXT keys, and select
the indicated menu option with the ENTER key. Menu choices
that are shown in lower case letters are
unavailable in the current
operating mode (LAND, ALTAZ, or POLAR). If you try to select a
lower case menu option, the keypad hand controller will emit
three warning beeps. Three
beeps always indicate an attempt to
perform an invalid
telescope operation.
14. Press the ENTER key to select Deneb. The keypad hand
controller displays a message (Display 25).
15. Center the alignment star (Deneb in our example) in the
eyepiece of the telescope. You can manually move the
telescope by loosening the Dec. lock knob and R.A. lock or
electrically by using the N, S, W, and E keys. If moving the
telescope electrically, be sure to use the speed keys, SLEW
to get close, FIND to center in the viewfinder, and CNTR to
center the star in the eyepiece. When the star is centered,
press ENTER.
The telescope is now aligned and fully functional, and
automatically begins to track objects. From this point on, make all
telescope movements using of the keypad hand controller. Manual
movements by loosening the Dec. or R.A. locks will cause the
LX200 to "lose" position, requiring realignment.
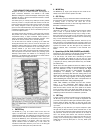
e. Using the MODE Key
The LX200 has 5 basic keypad hand controller displays, and
the MODE key is used to move between them. The 5 modes
are:
1. Telescope Functions.
The TELESCOPE mode is where all
telescope functions are changed or activated and the
OBJECT LIBRARY is where the features of the object library
are accessed.
12
5. Press the ENTER key. This selects the TELESCOPE
functions. The display should look like Display 16.
6. Press the NEXT key. This will move the arrow to the
lower
line (see Display 17).
9. Press the ENTER key to use the checked mode (ALTAZ).
The keypad hand controller display will look like Display 20.
10. Press "1" to select "Star." The display screen will now
look
like Display 21.
12. This message simply reminds you what you should do next.
Press ENTER to show a display like Display 23.