


11
Section 1: Assembly and Set-Up
11/25/15
RCR1542 and RCR1548 Rotary Cutters 312-556M
Table of Contents
3-Point Hook-Up
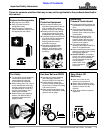
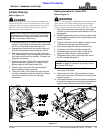
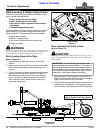
Refer to Figure 1-4:
!
DANGER
A Crushing Hazard exists when hooking-up equipment to a
tractor. Do not allow anyone to stand between tractor and
implement while backing-up to implement. Do not operate
hydraulic 3-point lift controls while someone is directly
behind tractor or near implement.
1. Slowly back tractor up to Rotary Cutter while using
tractor’s 3-Point hydraulic control lever to align lower
3-Point arm holes with cutter hitch pins (#1).
2. Engage tractor park brake, shut tractor engine off,
and remove key before dismounting from tractor.
3. Slide lower 3-point lift arms onto cutter hitch pins
(#1). Install linchpins (#2) through hitch pin holes to
lock lower 3-point arms into position. Linchpins are
supplied by customer.
4. Connect top center 3-Point link to upper hitch pin
holes using factory supplied 3/4" clevis pin (#3).
Secure clevis pin with hairpin cotter (#4).
5. Ensure tractor lower hitch arms are blocked to
prevent excessive side movement.
6. The arm lift rods on your tractor’s 3-point lift arms
should be adjusted to allow for lateral float. Please
consult your tractor’s manual for adjusting
instructions.
NOTE: Land Pride’s Quick Hitch can be attached to
the tractor to provide quick and easy 3-point hook-
up and detachment. See your nearest Land Pride
dealer to purchase a Quick-Hitch.
Tractor Hook-Up
Figure 1-4
37921
37298
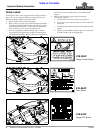
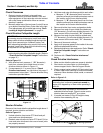
Hook-up Driveline to Tractor PTO
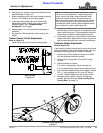
Refer to Figure 1-4:
!
WARNING
Do not use a PTO adapter. A PTO adapter will increase strain
on the tractor’s PTO shaft resulting in possible damage to
shaft and driveline. It will also defeat the purpose of the
tractor’s master shield and could cause bodily injury or death.
1. With tractor parked on a level surface, place gear
selector in park or set park brake. Make sure PTO is
disengaged.
2. Slowly engage tractor 3-point lift lever to raise cutter
until gearbox input shaft is at the same height as the
tractor PTO shaft.
3. Support cutter deck at this height with support jacks
or blocks to keep cutter from drifting down.
4. Shut tractor engine off and remove switch key.
5. Lift driveline (#5) off of driveline support (#6).
6. Driveline support (#6) will rotate up until secure
against A-frame (#8) as it is spring loaded.
7. Collapse driveline (#5) by pushing tractor end of
driveline toward the gearbox.
8. Pull back on driveline yoke collar (#7) and slide yoke
over tractor PTO shaft.
9. Release locking collar (#7) and continue to push
outer yoke onto tractor PTO shaft until locking collar
snaps into place.
10. The driveline should now be moved back and forth to
ensure both ends are secured to the tractor shaft and
gearbox shaft. Reattach any end that is loose.
IMPORTANT: Skip to “Check Driveline Collapsible
Length” on page 12 if driveline is too long to start
onto tractor PTO shaft.