34
Section 3: Operating Instructions
RCB6610 & RCBM6610 Series 2 S/N 944730+ Rotary Cutters 330-584M
11/11/12
Table of Contents
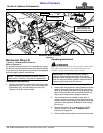
Rephasing Lift Cylinders
The lift cylinders may, after a period of time, get out of
time or phase. The effects of this can be seen when one
deck of the cutter is higher or lower than the other
because its lift cylinder is retracted more than the other lift
cylinder. Also, tractors with pressure detents do not allow
hydraulic systems to “automatically” rephase at the top of
the lift cycle. This must be done manually or the
rephasing cylinders will not function properly.
To rephase lift cylinders manually, raise cutter completely
up and hold tractor hydraulic lever on for several seconds
more to give cylinders time to rephase. This should be
done each time the cutter is raised and whenever the
decks are uneven.
Momentarily reversing the hydraulic lever immediately
after rephasing allows the cylinders to retract about 1/2"
and will help maintain a level cutter during transport.
Select Gear Range
Optimum ground speed depends on density of material
being cut, horsepower rating of tractor, and (in some
cases) terrain. Always operate tractor at cutter’s
full-rated PTO speed in a gear range that allows the
cutter to make a smooth cut without lugging the tractor
down, usually between 2 to 5 mph. Loss of PTO speed
will allow the blades to hinge back and result in ragged,
uneven cutting.
Engage Blades
1. Select a gear range that will allow cutter to make a
smooth cut without lugging the tractor down. See
“Select Gear Range” above for instructions.
2. With wing lowered, increase throttle to a speed just
enough to get the cutter started without stalling
tractor while slowly engaging PTO. Use tractor’s PTO
soft start option if available.
3. Ensure all power shafts are rotating and cutter is not
vibrating excessively after ramping up to full PTO
speed for at least 3 seconds. If excessive vibration
continues after 3 seconds at full PTO speed,
disengage PTO immediately, shut down tractor, and
remove switch key. Wait for blades to come to a
complete stop before dismounting tractor.
4. Investigate the cause if cutter was shut down due to
excessive vibration. See “Blade Operation
Inspection” on page 31 for detailed instructions.
5. Periodically, shut tractor down properly and dismount
to do an inspection. Refer to “Tractor Shutdown
Procedure” on page 14 for proper shut down
procedure.
IMPORTANT: Cutter blades can lock-up against
each other during start-up and shut-down especially
if tractor’s PTO engagement is “INSTANT ON” and
“INSTANT OFF”. Follow Blade Engagement and
Blade Disengagement instructions to help eliminate
blade lock up.
6. Periodically, shut tractor down properly and dismount
to do an inspection. Refer to “Tractor Shutdown
Procedure” on page 14 for proper shut down
procedure.
7. Dismount tractor and check for objects wrapped
around blade spindles. Block deck up before
removing objects.
8. Frequently inspect cutter for loose bolts and nuts.
Tighten all loose hardware as indicated in the
“Torque Values Chart” on page 62.
Disengage Blades
1. Slowly decrease throttle speed until engine idle
speed is reached.
2. Disengage PTO.
3. Stay on the tractor until the blades have come to a
complete stop. Always place tractor in park or set
park brake, shut tractor engine off, and remove
switch key before dismounting.


