


18
Section 2: Operating Instructions
AFM4214 and AFM4216 All-Flex Grooming Mowers 315-587M
11/14/08
Land Pride
Table of Contents
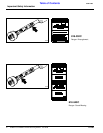
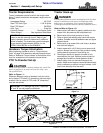
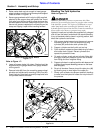
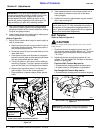
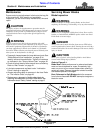
Refer to Figure 2-3:
3. AFM4216 models only. If narrow transport width is
required or if transporting long distances:
a. Insert 5/8” deck float pin (#1) in lock hole located
to the outside of both mower wing decks.
b. Make sure deck float pin is fully inserted.
Model AFM4216 Deck Float Pin
Figure 2-3
4. Refer to “Operating Instructions” on page 19 when
lowering the decks.
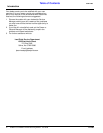
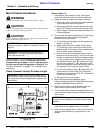
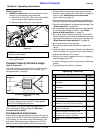
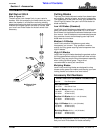
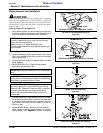
Constant Velocity Driveline Angle
Refer to Figure 2-4:
The main driveline is equipped with a constant velocity
(CV) joint that allows the unit to run at angles up to
80 degrees with no vibration.
Constant Velocity Driveline Angle
Figure 2-4
The constant velocity joint must be greased every 8
hours of operation. Refer to Page 31 “Driveline
Constant Velocity Shaft”.
Pre-Operation Instructions
Proper servicing and adjustments are key to the long life
of any machine. With careful and systematic inspection
of the mower, you can avoid costly maintenance, time
and repair. Before beginning to operate your All-Flex
Mower the following inspection should be performed.
26567
NOTE: Be sure to remove deck floating pins before
unfolding mower decks.
19626
IMPORTANT: Do not make turns that will subject the
CV joint to angles greater than 80
o
. Angles greater
than 80
o
will damage the driveline.
• Grease driveline shaft and all other grease fittings.
• Check oil level in gearboxes. Refer to the Lubrication
portion of the “Maintenance and Lubrication”
section starting on page 24.
• Check all plugs and caps in gearboxes to make certain
that they have been replaced and tightened properly.
• Check mower blades for sharpness and damage. See
“Blade Inspection” on page 24.
• Be sure blades are installed properly on each deck with
the cutting edge leading in rotation. See “Blade
Removal And Installation” on page 25.
• Be sure all mower blade bolts are tight. Know which
center blade bolts are left hand threaded and which are
right hand threaded when checking for tightness. See
“Blade Removal And Installation” on page 25.
• Be sure all bolts and nuts are tight.
• Be certain all guards and shields are in place and
secure.
• Clear the area to be mowed of objects and debris that
might be picked up and thrown by the mower blades
• Operate with 540 rpm PTO tractor.
• Refer to your tractor’s operator manual for engaging
and disengaging the PTO.
• In case of emergency learn to stop tractor and mower
quickly.
• Complete Operating Check List below.
Operating Check List
✔
Check
Refer
Read and understand all Safety Rules. Page 1
Make sure all gearboxes are properly
lubricated.
Page 24
Read and follow proper tractor hook-up
procedure.
Page 13
Make sure all tires are properly inflated.
Page 43
Lubricate mower components as needed. Page 24
Check mower initially and periodically for
loose bolts & pins.
Make sure hitch safety chain is securely
attached to the mower hitch and tractor.
Page 13
Inspect cutting blades. Make note of blade
wear and sharpness.
Page 24
Make a thorough examination of the
drivelines. Also check connections to the
gearboxes and tractor PTO shaft.
Make sure all guards and shields are in
place.