


17
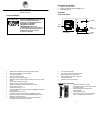
* When the signal is successfully received by the Weather Station, the
outdoor transmission icon
will be switched on. If not successful, the
icon will not be shown on LCD. The user can then easily see whether the
last reception was successful (icon on) or not (icon off). A short blinking of
the icon indicates that signal reception is currently taking place.
MANUAL SETTINGS:
The following manual settings can be changed when pressing the SET
key:
LCD contrast setting
Time zone setting
DST ON/OFF setting
Time reception ON/OFF setting
12/24-hour format setting
Manual time setting
Calendar setting
°F/°C temperature setting
Air pressure setting (hPa / inHg)
Relative air pressure setting
Weather forecasting icon sensitivity setting
18
Note: SET mode is entered by pressing and holding the SET key for 3
seconds. If you do not press any keys for 15 seconds while in SET
mode, the Weather Station switches out of SET mode.
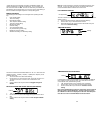
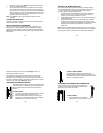
LCD CONTRAST SETTING:
The LCD contrast can be set within 8 levels, from LCD 0 to LCD7 (Default
setting is LCD 4):
1. Press and hold the SET key until the digit starts flashing.
2. Use the OUT/+ key to view all levels of contrast.
3. Select the desired LCD contrast. Confirm with the SET key and
enter in the Time Zone setting.
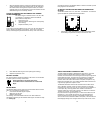
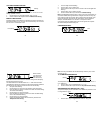
TIME ZONE SETTING:
Flashing
Last digit flashing
19
The time zone default of the Weather Station is “-5h”. U.S. time zones are
negative numbers: –5h(EST), -6h(CST), -7h(MST) and –8h(PST).To set
a different time zone:
1. The current time zone value starts flashing.
2. Use the OUT/+ key to set the time zone. The range runs from 0 to -
12 and then runs from +12 back to 0 in consecutive 1-hour
intervals.
3. Confirm with the SET key and enter the Daylight saving time
ON/OFF.
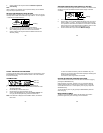
DAYLIGHT SAVING TIME ON/OFF SETTING (DST ON/OFF)
1. “ON” will flash on the LCD and "DSt" will display.
2. Use the OUT/+ key to turn the daylight saving time function ON or
OFF.
3. Confirm with the SET key and enter the Time reception ON/OFF
setting.
Flashing
20
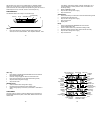
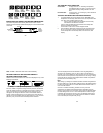
TIME RECEPTION ON/OFF SETTING:
In areas where reception of the WWVB time is not possible, the WWVB
time reception function can be turn OFF. The clock will then work as a
normal Quartz clock. (Default setting is ON).
4. “ON” will start flashing on the LCD and "RCC" will display.
5. Use the OUT/+ key to turn OFF the time reception function.
6. Confirm with the SET key and enter the 12/24-hour format
setting.
Note: If the Time Reception function is turned OFF, the clock will not
attempt reception of the WWVB time. The time reception icon and
the “WWVB” icon will not be displayed on the LCD. Time Reception
must be set to "ON" for the WVVB atomic time to function.
Flashing