


8
“DST 0” indicates that the feature is off and the WWVB will not change
times automatically. “DST 1” indicates that the feature is on and the WWVB
will change times automatically.
Note: Some locations (Arizona and parts of Indiana) do not follow Daylight
Saving Time, and should select “DST 0.”
6. Press and release the SET button to confirm and advance to the radio-
controlled time on/off setting.
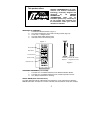
VI. RADIO-CONTROLLED TIME ON/OFF SETTING
1. Press and hold the SET button for 5 seconds.
2. “LCD” will show in the time LCD and the number setting will flash.
3. Press and release the SET button three times.
4. “RCC” will appear in the date LCD and “ON” or “OFF” will flash in the
time LCD.
5. Press and release the IN button to select radio-controlled time on or
off.
6. Press and release the SET button to confirm and advance to the
12/24-hour time setting.
VII. 12 OR 24 HOUR TIME SETTING
1. Press and hold the SET button for 5 seconds.
2. “LCD” will show in the time LCD and the number setting will flash.
3. Press and release the SET button four times.
4. “12h” or “24h” will flash in the time LCD.
5. Press and release the IN button to select 12 or 24-hour time format.
Note: When in the 12-hour format “P.M.” will appear to the left of the hour
in the time LCD between the hours of noon and midnight.
6. Press and release the SET button to confirm and advance to the time
setting.
VIII. TIME SETTING
There are two methods by which the time and date can be set:
A) Automatically via WWVB reception, or
B) Manually.
A. WWVB (Remote Control Time)
This method requires you to do nothing, except wait for the signal to be received, and to select a
time zone. Reception usually takes approximately 10 minutes during optimal conditions. The
best condition for reception is at night, between midnight and 6:00 am—when there is less
atmospheric interference. To keep your time as accurate as possible, Wireless Weather Station