


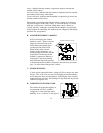

8
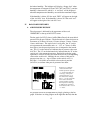
VII. DATE DISPLAY SETTING
1. Press the SET button nine times to enter the Date Display setting
mode.
2. The default “month/date/year” display will flash in LCD 2.
3. Press the CH/+ button to toggle between the default setting and the
“weekday/month/day” setting.
4. Press the SET button to confirm, and to advance to select °F or °C.
VIII. SELECTING °F OR °C AND INCHES OR MILLIMETERS
1. Press the SET button ten times to enter the °F/°C setting mode.
2. The default “F” will flash in LCD 1.
3. Press the CH/+ button to toggle between “F” and “°C.”
Note:
When
°
F is selected, the rainfall measurement will change to
inches. When
°
C is selected, the rainfall measurement will change
to millimeters. When the selection is made the effects are seen
immediately in temperature and rainfall measurement readings
found in other LCD screens.
4. Press the SET button to confirm, and to advance to set the Weather
Forecast Sensitivity.
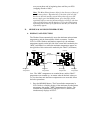
IX. WEATHER FORECAST SENSITIVITY SETTING
Note:
A higher hPa (Hekto Pascal) setting decreases the forecasting
sensitivity of the unit, this feature is available for persons living in areas
where air pressure changes are significant. (not necessarily related to a
change of weather). A lower hPa setting is available for areas with a
more constant air pressure. This designates that it takes 2 hPa of
pressure change to change the forecast icon. Note that 1 hPa change =
0.03 inHg (Inch Column of Mercury) change. 1 hPa= 1 mb (millibar).
The hPa options that appear in LCD 4 are “2” hPa= 0.06 inHg, “3”
hPa= 0.09 inHg, and “4” hPa= 0.12 inHg.
1. Press the SET button eleven times to reach the Weather Forecast
Sensitivity setting mode.
2. The default sensitivity level of “3” will flash in LCD 4.
3. Press the CH/+ button to select a weather forecast sensitivity level
(2 through 4).
4. Press the SET button to confirm, and to advance to the Relative or
Absolute display setting.