


9
Install and use this eyepiece the same way you do with the Barlow lens. You cannot use the Barlow lens
when using this eyepiece.
2.1.5.
Focusing Telescope
After selecting the desired eyepiece, aim the telescope tube at a land-based target at least 200 yards away
(e.g. A telephone pole or a building). Fully extend focuser drawtube by turning the focusing knob. Always
start with a low power eyepiece.
While looking through selected eyepiece, slowly retract focuser drawtube by turning focusing knob until
object comes into focus.
2.1.6.
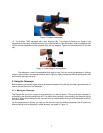
Aligning Finderscope:
The extended field of view (FOV) offered by the 5x24 mm finderscope (#2) makes it easier to aim at an
object before viewing it through the main telescope tube with a higher magnification.
1). Remove the front lens cover from the telescope (#1). Select a low power eyepiece (20mm). Look
through telescope and establish a well-defined target (see focusing telescope section). Tighten all locking
knobs so that telescope’s aim is not disturbed.
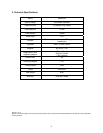
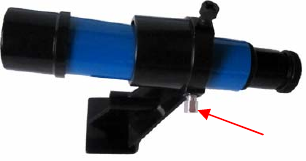
2). Looking through the finderscope, alternate tightening or loosing each finderscope adjustment screw
(see Figure 14) until the crosshairs of the finderscope are precisely centered on the same object already
centered in main telescope’s field of view.
Figure 14. Finderscope
3). Now, objects centered with the finderscope first will be shown in the FOV of the main telescope. They
can be focused by turning the finderscope’s threaded eyepiece. The image in the finderscope will be
reversed.
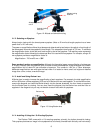
2.2. Star Observation
First of all you will need to choose an object that is easy to find. The Moon or a bright star is a good target to
start with.
1. Slightly loose the telescope's altitude locking knob (#12) and the azimuth locking knob (#13). By
applying slight pressure by hand, the telescope should now move freely along its two axes.
2. Move the telescope along altitude (vertical) and azimuth (horizontal) axes and using the aligned
finderscope to find the Moon. With the object centered in the finderscope's cross hairs, retighten the altitude
and azimuth knobs.
3. The Moon should be visible somewhere within the FOV of the main telescope. Focus the image by
adjusting the focusing knob (#6). Center the Moon by adjusting the mount in altitude and azimuth directions.
4. You’ll find that the object immediately starts to shift across the FOV. This motion is due to the earth
rotation. Lower-power eyepieces will reduce this effect of movement considerably and allow you to observe
an object for a longer duration before you have to readjust your telescope. To "track" the object and keep it
in the FOV, adjust the altitude using the Altitude slow motion rod and the azimuth by loosing the azimuth
Adjustment
scre
w