


Storage – Gasoline Vehicles
2008 Husqvarna 4210-G, 4210-E, 4210-GXP, and 4210-EXP Owner’s Manual Page 29
STORAGE – GASOLINE VEHICLES
See General Warnings on page 10.
ý DANGER
• Do not attempt to drain fuel when the engine is hot or while it is running.
• Be sure to clean up any spilled gasoline before operating the vehicle.
• Store fuel in an approved fuel container only. Store in a well-ventilated area away from sparks,
open flames, heaters, or heat sources.
• Keep fuel out of the reach of children.
• Do not siphon fuel from the vehicle.
ý WARNING
• Only trained technicians should service or repair the vehicle or battery charger. Anyone doing
even simple repairs or service should have knowledge and experience in electrical and
mechanical repair. The appropriate instructions must be used when performing maintenance,
service, or accessory installation.
• Turn the key switch to the OFF position, remove the key, and leave the Forward/Reverse
handle in the NEUTRAL position during storage. This is to prevent unintentionally starting the
vehicle or a fire hazard.
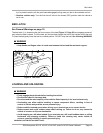
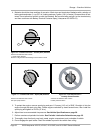
• Turn the fuel shut-off valve to the closed (OFF) position (Figure 16).
ý CAUTION
• Batteries in a low state of charge will freeze at low temperatures.
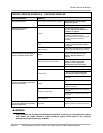
PREPARING THE GASOLINE VEHICLE FOR EXTENDED STORAGE
1. Store vehicle in a cool, dry place. This will minimize battery self-discharge. If the battery appears to be
weak, have it charged by a trained technician. Use an automotive-type 12-volt battery charger rated at
10 amps or less.
2. Drain carburetor and seal the fuel tank.
2.1. Place the Forward/Reverse handle in the NEUTRAL position. Turn the fuel shut-off valve to the
closed (OFF) position (Figure 16, Page 30) and run the engine until fuel remaining in the carbu-
retor and fuel lines is depleted and the engine stalls.
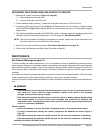
2.2. Loosen, but do not remove, the carburetor drain screw and drain fuel remaining in bowl into a small,
clean container, then pour the fuel from the container into vehicle fuel tank. Tighten the carburetor
drain screw.
2.3. Disconnect fuel vent line from fuel tank vent nipple.
2.4. Plug the fuel tank vent nipple so that it is air tight. We recommend using a slip-on vinyl cap.
3. Disconnect the battery cables, negative (–) cable first.