


9
The trimmer is shipped WITHOUT OIL in the engine.
NOTE:Fill oil before starting engine.
Running the engine with too little or too much oil can
cause engine damage.
Check the engine oil level before each use, or every 10
hours if operated continuously. Rest the trimmer on a level
surface, with the engine stopped and in an upright position.
NOTE:
• Engine Oil Level Check
1. Place the trimmer on a level surface, and then
remove the oil filler cap/dipstick.
4. Screw in the oil filler cap/dipstick securely.
Running the engine with too little or too much oil can
cause engine damage.
NOTE:
4. Screw in the oil filler cap/dipstick securely.
2. Slowly add the recommended oil (included in the box)
to the bottom edge of the oil filler opening. Do not
overfill, as the engine oil tank capacity is small.
3. If the supplied oil is not used, add enough SAE 10W-
30 API service category SJ or later oil. Add oil until
the oil level is to the bottom edge of the oil filler
opening.
1. Remove the filler cap/dipstick and wipe it clean.
2. Insert and remove the dipstick without screwing it into
the filler opening. Check the oil level shown on the
dipstick.
3. If the oil level is low, fill to the edge of the oil filler hole
with the recommended oil . To avoid overfilling or
underfilling, be sure the engine is in a level position,
as shown.
ENGINE OIL
Drain the used oil while the engine is warm. Warm oil
drains quickly and completely.
• Engine Oil Change
• Engine Oil Recommendations
1. Place a suitable container below the engine to catch
the used oil, then remove the filler cap/dipstick and
drain the used oil through the filler opening. Allow the
used oil to drain completely.
Please dispose of used motor oil in a manner that is
compatible with the environment. We suggest you
take used oil in a sealed container to your local
recycling center or service station for reclamation. Do
not throw it in the trash, pour it on the ground, or pour
it down a drain.
2. With the engine in an upright position, fill to the edge
of the oil filler hole with the recommended oil.
3. Screw in the filler cap/dipstick securely.
Oil is a major factor affecting performance and service
life. Use 4-stroke automotive detergent oil.
SAE 10W-30 is recommended for all temperatures within
the recommended operating range for these trimmers.
The recommended operating range extends from 23° ~
104°F (-5° ~ 40°C).
The SAE oil viscosity and service classification are on the
API label on the oil container. Recommend that you use
API service category SJ or later.
NOTE: change the engine oil after first month or 10 hours.
NOTE: change the engine oil every 6 months or 50 hours.
10
Fig.7B
Fig.7D
Fig.7C
GB GB
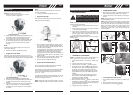
• SHOULDER HARNESS
NOTE: When you install the cutting attachment, please
follow the below requirements:
1. Put the harness on so the shoulder strap is over your
shoulders.
2. Attache the harness clip (C) to the ring (D) mounted
on the shaft (Fig. 8A and 8B).
3. Adjust length of shoulder strap so stringhead is par-
allel to the ground as it hangs from the strap. A few
practice swings without starting engine should be
made to determine correct balance.
NOTE: Detach the shoulder harness from the unit before
starting engine.
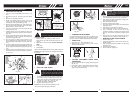
• STARTING A COLD ENGINE
NOTE: To minimize load on engine during starting and
warm-up, trim excess cutter line to 13cm (Fig. 9A).
1. Press ON/OFF switch to the “RUN (I)” position (Fig.
9B).
2.
3.
Press the primer bulb 10 times.(Fig.9D)
Move choke lever to CHOKE“ ” position.(Fig.9C)
6.
If engine fails to start, repeat step 1 to 5.
If engine fails to start, refer to Starting a cold engine
section.
5.
Move choke lever to RUN “ ” position. Engine will be
started when pull starter rope 1 time. Continually warm
10 seconds after engine started, and then pull throttle
trigger to full position. (Fig. 9G)
1.
2.
NOTE: If enginefails to start afterrepeated attempts, refer
to Troubleshooting section.
NOTE: Always pull starter rope straight out.Pulling starter
at an angle will cause rope to rub against the eyelet.This
friction will cause the rope to fray and wear more quickly.
Always hold starter handle when rope retracts. Never
allow rope to snap back from extended position. This
could cause rope to snag or fray and also damage the
starter assembly.
OPERATING INSTRUCTIONS
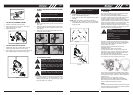
WARNING: ALWAYS WEAR SHOULDER
HARNESS when operating unit withablade.
Attach harness to trimmer after starting unit
and engine is running at IDLE. Turn ENGINE
OFF before disconnecting shoulder harness.
Fig. 8A Fig. 8B
D
D
Fig. 9A Fig. 9B
13cm
For String
Head
0-300mm
For blade
100-400mm
B
C
BC 435L
BC 435L
BC 435B
BC 435B
A
Fig. 9C Fig.9D
Fig. 9E
Fig. 9F
A
B
B
A
Fig. 9G Fig.9G
C
A
• WARM ENGINE START
Move choke lever to RUN ” “ position. Engine will be
started after pulling starter rope 2 times.(Fig.9G)
BC 435L
BC 435B
4. Set throttle lock (C):Press the throttle trigger lockout
(A) down and then while holding throttle trigger (B)
at partially open position, press down and hold
throttle lock (C). Release throttle trigger (B). Throttle
trigger (B)will now remain in the partially depressed
position;
If no throttle lock: Press the throttle trigger lockout
down and then while holding throttle trigger (B) at
one-third open position.(Fig. 9B)
Pull starter rope 3 times. (Fig. 9F)
3.
2. Press the primer bulb 10 times.(Fig.9D)
Move choke lever to CHOKE” ” position.
• Low temperature start (0-5 C)
1. Press ON/OFF switch to the “RUN (I)” position (Fig.
10A).
O