


15
SERVICE AND ADJUSTMENTS
ENGINE
ENGINE SPEED
Your engine speed has been factory set. Do not attempt to
increase engine speed or it may result in personal injury. If
you believe that the engine is running too fast or too slow,
take your lawn mower to a Husqvarna service center for
repair and adjustment.
CARBURETOR
Your carburetor is not adjustable. If your engine does not
operate properly due to suspected carburetor problems,
take your lawn mower to a Husqvarna service center for
repair and/or adjustment.
IMPORTANT: NEVER TAMPER WITH THE ENGINE
GOVERNOR, WHICH IS FACTORY SET FOR PROPER ENGINE
SPEED. OVER SPEED ING THE ENGINE ABOVE THE FACTORY
HIGH SPEED SETTING CAN BE DANGEROUS. IF YOU THINK
THE ENGINE-GOVERNED HIGH SPEED NEEDS ADJUSTING,
CONTACT YOUR NEAREST HUSQVARNA SER VICE CEN TER,
WHICH HAS PROPER EQUIP MENT AND EXPERIENCE TO
MAKE ANY NEC ES SARY ADJUSTMENTS.
STORAGE
2. Route the other end of the new drive belt through hole
in housing.
3. Reattach debris shield to housing with screw previ-
ously removed. Be sure tab of debris shield is in gap
of housing.
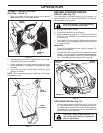
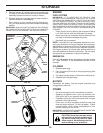
4. Position blade on the blade adapter aligning the two
(2) holes in the blade with the raised lugs on the
adapter.
5. Be sure the trailing edge of blade (opposite sharp edge)
is up toward the engine as shown (See Fig. 19).
6. Install the blade bolt with the lock washer and hardened
washer into blade adapter and crankshaft.
7. Use block of wood between blade and lawn mower hous-
ing and tighten the blade bolt, turning clockwise.
• The recommended tightening torque is 35-40 ft. lbs.
IMPORTANT: BLADE BOLT IS HEAT TREATED. IF BOLT NEEDS
REPLACING, REPLACE ONLY WITH APPROVED BOLT SHOWN
IN THE REPAIR PARTS SECTION OF THIS MANUAL.
8. Return mower to upright position.
9. Install new drive belt into idler arm assembly, then
around the drive pulley.
NOTE: Pulling on the drive belt (to install it on the drive
pulley) will cause the other end of the belt to free itself from
the debris shield retainer and come into contact with the
pulley end of the blade adapter.
10. Reattach drive cable and return spring to the idler arm
assembly, then reattach drive cable to anchor.
11. Reattach drive cover with screws previously removed
(See Fig. 17).
12. Connect spark plug wire to spark plug.
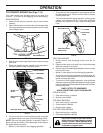
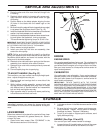
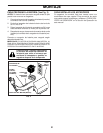
TO ADJUST HANDLE (See Fig. 21)
The handle on your lawn mower has multiple height posi-
tions - adjust to height that suits you.
1. Remove knob and carriage bolt on one side of the
lower handle.
2. While holding handle assembly, remove knob and
car riage bolt from opposite side, align hole in handle
with desired hole in handle bracket and reassemble
bolt and knob and tighten securely.
3. Align opposite side of handle with same positioning
hole and secure with bolt and knob.
FIG. 21
HANDLE
BRACKET
KNOB BOLT
HIGH
LOW
Immediately prepare your mower for storage at the end
of the season or if the unit will not be used for 30 days or
more.
LAWN MOWER
When lawn mower is to be stored for a period of time, clean
it thoroughly, remove all dirt, grease, leaves, etc. Store in
a clean, dry area.
1. Clean entire lawn mower (See “CLEANING” in the
Maintenance section of this manual).
2. Lubricate as shown in the Maintenance section of this
manual.
3. Be sure that all nuts, bolts, screws, and pins are se-
curely fastened. Inspect moving parts for damage,
breakage and wear. Replace if necessary.
4. Touch up all rusted or chipped paint surfaces; sand
lightly before painting.
HANDLE (See Figs. 22 and 23)
You can fold your lawn mower han dle for storage.
1. Loosen the two (2) handle knobs on sides of the upper
handle and allow handle to fold down to the rear.