


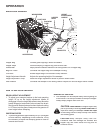

9
FIGURE 22
STEP 22 - ATTACH HOPPER BAG
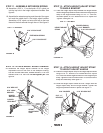
17.
To attach the hopper bag to the sweeper, slide the ends
of the bag arm tubes into the ends of the hitch tubes
and secure with two 1/4" x 1-3/4" clevis pins and small
hairpin cotters. See fi gure 25.
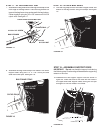
STEP 21 - ATTACH ROPE
16.
Secure the rope to the center of the upper rear hopper
tube as shown in fi gure 24.
FIGURE 25
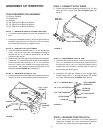
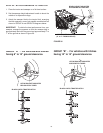
STEP 20 - ASSEMBLE HOPPER ROD, TUBES
AND CLAMPS
11.
If the hole in the side of the upper hopper tubes is
covered over by the bag, locate the hole by touch. It is
approximately midway along the side of the bag. Pierce
holes through the stitched bag fl aps where the holes in
both hopper tubes are located. See fi gure 21.
FIGURE 24
1/4" X 1-3/4"
CLEVIS PIN
SMALL
HAIRPIN
COTTER
HITCH TUBE
HITCH TUBE
BAG ARM TUBE
UPPER HOPPER TUBE
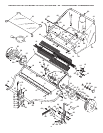
FIGURE 21
MOUNTING CLAMP
BAG ARM TUBE
PIVOT ROD
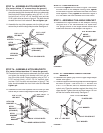
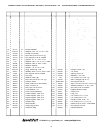
12.
Slide the hopper bag pivot rod through the hole in an
upper hopper tube. Assemble a mounting clamp, two
bag arm tubes and another mounting clamp onto the
rod as shown in fi gure 22. Push the rod on through the
upper hopper tube on the opposite side of the bag.
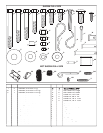
5/16" x 3/4"
HEX BOLT
5/16" NYLOCK NUT
PALNUT
MOUNTING CLAMP
VINYL CAP
13.
Assemble the two remaining hopper mount clamps onto
the pivot rod on the outside of the bag. Fasten them to
the inside clamps using four 5/16" x 3/4" hex bolts and
5/16" nylock nuts. Tighten securely. See fi gure 23.
14.
Assemble two palnuts onto the ends of the pivot rod by
lightly tapping them with a hammer. See fi gure 23.
15.
Place a vinyl cap onto each bag arm tube. See fi gure 23.
HINT:
To ease assembly of the palnuts, place the bag on
its side on a hard surface. With the bottom end of the
pivot rod against the surface, tap a palnut onto the top
end of the rod. Repeat for other end of rod.
FIGURE 23