


9
42858-01 • 09/10/09 • Hunter Fan Company
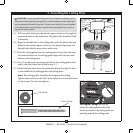
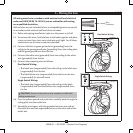
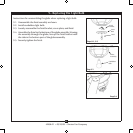
Step 6-2
Step 6-3
Canopy
Screw
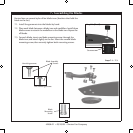
6-1. Partially install two canopy screws into the ceiling plate and rotate
one time.
6-2. Holding the canopy, raise the fan o the hook.
6-3. Align the slots in the canopy with the already partially installed
canopy screws on the ceiling plate.
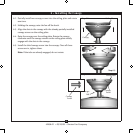
6-4. Raise the canopy over the ceiling plate. Rotate the canopy
clockwise until the canopy screws on the ceiling plate totally
engage with the slots in the canopy.
6-5. Install the third canopy screw into the canopy. Once all three
screws are in, tighten them.
Note: If the tabs are already engaged, do not rotate.
Canopy
Ceiling Plate
Step 6-4
Ceiling Plate
Hanger
Ball
Canopy
Screw
6 • Installing the Canopy