


For technical questions, please call 1-800-444-3353;
Troubleshooting section at end of manual.
SKU 99741 PAGE 12
PREPARE THE CLEANING AREA.5.
Clear the cleaning area of all objects
that are not being cleaned. If any
water prone or delicate items cannot
be moved, protect them. If detergent
is to be used, cover or remove any
plants or animals that may be dam-
aged by the detergent.
PLACE THE PRESSURE WASHER 6.
IN AN APPROPRIATE LOCATION.
The location should be protected
from any water from the cleaning
area; select a location higher than
the cleaning area. The pressure
washer’s location should be close
enough so that the hose will reach
every portion of the job to be done
with some slack for movement. Also,
select an area with proper access to
a dedicated circuit.
OPERATION
Read the ENTIRE IMPORTANT
SAFETY INFORMATION
section at the beginning of this
manual including all text under
subheadings therein before set
up or use of this product.
TO PREVENT
SERIOUS INJURY
FROM ACCIDENTAL
OPERATION:
Turn the Power Switch of the
equipment to its “OFF”
position before performing
any inspection, maintenance,
or cleaning procedures.
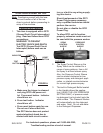
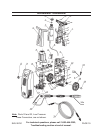
Attach the High Pressure Hose to 1.
the Port on the front of the Pressure
Washer.
Attach the Water Gun into the Water 2.
Gun, and press and twist the Wand
into the Extension until the Wand
locks in place.
NOTE: The Pressure Washer will not
pressurize if the Nozzle is not com-
pletely assembled. It will not work
properly with only part of the Wand
installed.
Connect the High Pressure Hose to 3.
the Pressure Washer. Make sure all
connections are tight. Then, open
the water supply valve fully. If leaks
occur, shut off water and retighten
connections.
IMPORTANT! Prior to turning on 4.
the Pressure Washer, connect the
unit to the water supply. Turn on
the water, disengage the safety,
and squeeze the Trigger until water
ows out of the Water Gun. This
removes air from the system and
allows the unit to properly perform.
Failure to follow this step can dam-
age the Pump.
Connect the GFCI plug and test it, 5.
as explained on page 10. Turn the
Power Switch to the “ON” position.
The motor will briey run when the
switch is rst turned on to build
up pressure and then go to standby
until the trigger is squeezed.
NOTE: The Motor does not run con-
tinuously, but only when the Trigger is