


22 Automatic Standby Generator Owner’s Manual
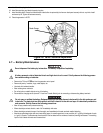
4. Clean the plug by scraping or washing with a wire brush and commercial solvent. Do not blast the plug to clean.
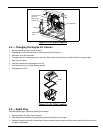
5. Check the spark plug gap using a wire feeler gauge. See Figure 4-5. Adjust the gap by carefully bending the ground electrode to:
•7 kW units - 0.76 mm (0.030 in)
6. Install spark plug. Torque to 20-22 ft/lb (27-30 Nm). Install spark plug boot.
7. Install top lid. Tighten fasteners securely.
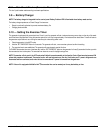
Figure 4-5: Spark Plug Gap Adjustment
4.6 — Valve Lash Adjustment
After the first 20 hours of operation and then after every 300 hours of operation, check the valve clearance. Adjust if necessary.
Important: Please contact the Dealer for service assistance. This is a very important step to ensure longest life for the engine.
To check valve clearance:
1. The engine should be cool before checking. Make sure the engine is at 60 - 80 °F (16 - 27 °C).
2. Turn the generator to OFF.
3. Remove enclosure lid fasteners and lid. Then remove the back panel by undoing the fasteners.
4. Remove spark plug wire and position wires away from plug.
5. Remove spark plug.
6. Make sure the piston is at Top Dead Center (TDC) of its compression stroke (both valves closed). To get the piston at TDC, remove the rub-
ber plug in the center of the intake screen at the front of the engine to gain access to the flywheel nut. Use a 24 mm socket and ratchet to
rotate the engine in a clockwise direction. While watching the piston through the spark plug hole. The piston should move up and down.
Watch the intake valve open and close. The piston is at TDC, of it’s compression stroke, when it is at its highest point of travel.
7. Check clearance between the rocker arm and the valve stem with a feeler gauge.
8. If valve clearance is 0.002 - 0.004 in (0.05 - 0.1 mm), adjustment is not needed.
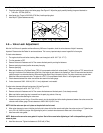
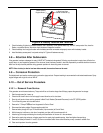
To adjust valve clearance (after performing steps 1-8) (see Figure 4-6):
1. Make sure the engine is at 60 - 80 °F (16 - 27 °C).
2. Remove enclosure lid fasteners and lid. Then remove the fasteners and the back panel. (if not already removed)
3. Make sure that the spark plug wire is removed from the spark plug and out of the way.
4. Remove the six screws attaching the valve cover.
5. Loosen the rocker jam nut. Using a 13 mm Allen wrench, turn the pivot ball stud while checking clearance between the rocker arm and the
valve stem with a feeler gauge. Correct clearance is 0.002-0.004 in (0.05-0.1 mm).
NOTE: Hold the rocker arm jam nut in place as the pivot ball stud is turned.
6. When valve clearance is correct, hold the pivot ball stud in place with the Allen wrench and tighten the rocker arm jam nut. Tighten the jam
nut to 174 in-lb (19.68 N-m) torque. After tightening the jam nut, recheck valve clearance to make sure it did not change.
7. Install new valve cover gasket.
NOTE: Make sure the new valve cover gasket is in place. Start all six screws before tightening or it will not be possible to get all the
screws in place.
8. Install the valve cover. Tighten the fasteners to 35-62 in/lb (4-7Nm).