


10
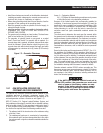
Be sure the utility power supply is turned off
and the 7.5A fuse is removed from the gen-
erator control panel, or sparking may occur at
the battery posts as the cables are attached
and cause an explosion.
Servicing of the battery is to be performed or supervised by per-
sonnel knowledgeable of batteries and the required precautions.
Keep unauthorized personnel away from batteries.
See the Specifications section for the correct size and rating when
replacing the battery. Have these procedures performed at the
intervals specified in the “Service Schedule.” A negative ground
system is used. Battery connections are shown on the wiring dia-
grams. Make sure the battery is correctly connected and terminals
are tight. Observe battery polarity when connecting the battery to
the generator set.
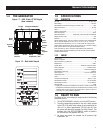
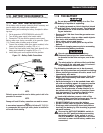
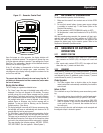
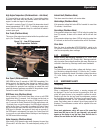
1.13 BATTERY CHARGER
NOTE:
The battery charger is integrated into the control module
in all models and requires input to the generator between
90-265VAC.
It operates as a "Smart Charger" which ensures output is continu-
ally optimized to promote maximum battery life and charging levels
are at safe conditions. The user can monitor both battery voltage
and current charge in both "Boost" and "Float" modes on the LCD
display on the controller.
NOTE:
There is a warning on the LCD display when the battery needs
service.
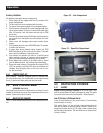
2.1 ACTIVATE THE GENERATOR
When battery power is applied to the generator during the installa-
tion process, the controller will light up. However, the generator still
needs to be activated before it will automatically run in the event
of a power outage.
Activating the generator is a simple one time process that is guided
by the controller screen prompts. Once the product is activated, the
controller screen will not prompt you again, even if you disconnect
the generator battery.
After obtaining your activation code, please complete the following
steps at the generator’s control panel in the Activation Chart.
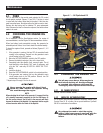
2.2 BEFORE INITIAL START-UP
NOTE:
These units have been run and tested at the factory prior to
being shipped and do not require any type of break-in.
NOTE:
This unit comes filled with oil from the factory. Check the oil
level and add the appropriate amount if necessary.
Before starting, complete the following:
1. Set the generator’s main circuit breaker to its OFF (or OPEN)
position.
2. Set the generator's AUTO/OFF/MANUAL switch to the OFF
position.
3. Turn OFF all breakers on the load center of the transfer box (T1
and T2).
4. Turn OFF all loads connected to the transfer switch terminals
T1 and T2.
5. Check the engine crankcase and reservior oil level and, if nec-
essary, fill to the dipstick FULL mark with the recommended
oil. Do not fill above the FULL mark.
6. Check the fuel supply. Gaseous fuel lines must have been
properly purged and leak tested in accordance with applicable
fuel-gas codes. All fuel shutoff valves in the fuel supply lines
must be open.
During initial start up only, the generator may exceed the normal
number of start attempts and experience an “over crank” fault (See
the "Overcrank" section). This is due to accumulated air in the fuel
system during installation. Reset the control board and restart up
to two more times, if necessary. If unit fails to start, contact the
local dealer for assistance.
n
Never operate the engine with the oil level
below the “Add” mark on the dipstick. Doing
this could damage the engine.
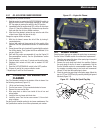
2.3 ELECTRICAL CHECKS
Complete electrical checks as follows:
1. Set the generator's main circuit breaker to its OFF (or OPEN)
position.
2. Set the generator's AUTO/OFF/MANUAL switch to the OFF
position.
3. Turn on the battery charger power supply to the generator
using the means provided (such as a utility main line circuit
breaker).
The generator is now electrically “hot.”
Contact with “hot” parts will result in
extremely hazardous and possibly fatal elec-
trical shock. Proceed with caution.
4. Check battery charger power source voltage across terminals
T1 and the transfer switch neutral lug; then across terminal
neutral. Nominal line-to-neutral voltage should be 120 volts
AC.
Post Installation Start-up and Adjustments