


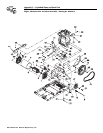
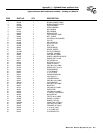
34 Generac
®
Power Systems, Inc.
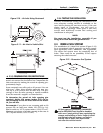
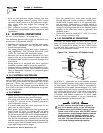
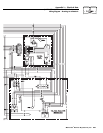
2.8.1 REMOTE START/STOP CONNECTIONS
The following steps are necessary to connect the
remote start/stop option:
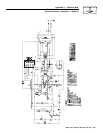
1. If the six-wire remote connector is visible below
the control panel, as shown in Figure 2.20, skip
to step 5. Otherwise, proceed with step 2.
2. Remove the electrical access panel located just
below the knock-out labeled “REMOTE.” The
remote connector will be located inside the elec-
trical enclosure, along the right side.
3. Remove the “REMOTE” knock-out, taking care
not to damage the wiring behind it.
4. Feed the remote connector through the hole, and
fit the supplied grommet into position.
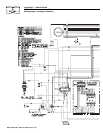
5. Wire the remote harness (Part # C6712C, sup-
plied as an accessory with the generator) to the
vehicle’s remote start panel. Refer to Figure 2.20
for a wiring legend.
6. Plug the remote harness into the mating remote
connector on the generator.
3.1 POST INSTALLATION TESTS
The generator set was factory-tested and adjusted.
You should not be required to adjust the unit any fur-
ther, except under special circumstances.
Do not make any unnecessary adjustments.
Factory settings are correct for most applica-
tions. When making adjustments, however, be
careful to avoid overspeeding the engine.
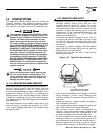
3.2 BEFORE INITIAL STARTUP
Before starting, complete the following:
1. Check the engine crankcase oil level and, if nec-
essary, fill to the dipstick “FULL” mark (cross-
hatched area) with the recommended oil. Do not
fill above the FULL mark.
2. Check the fuel supply. Fuel lines must have been
properly purged and leak-tested in accordance
with applicable fuel codes. All fuel shutoff valves
in the fuel supply lines must be open.
3.3 INITIAL START
When you are absolutely certain that the unit has
been properly installed and prepared for use, start
the engine as follows:
1. Turn off all electrical loads. Do this by setting the
generator’s line breakers to their “OFF” (or open)
position.
2. Refer to Part I, Section 2.4, “Starting the
Generator” (Page 8), for cranking and starting
instructions. The engine may require more
cranking for initial starting, since the fuel lines
have to be primed (use of the preheat switch will
operate the generator’s electrical fuel pump and
shorten this time).
3. Let the engine warm up for about five minutes to
allow internal temperatures to stabilize.
4. Carefully inspect the engine/generator for fuel, oil,
and exhaust system leaks. Before proceeding to the
next step, correct any leakage immediately.
5. When all tests and adjustments at no-load are
completed, apply electrical loads and check
for proper operation under load. See Section
3.4. Run the unit at least 30 minutes, with
loads applied.
6. Turn off all electrical loads by setting the gen-
erator’s line breakers to their “OFF” (or open)
position.
7. Let the unit run at no-load for a few minutes to
stabilize internal engine/generator temperatures.
Then, shut down the engine.
NOTE:
The generator set was thoroughly tested and
adjusted at the factory before shipping. No addi-
tional adjustment should be necessary. Only
trained, qualified service technicians should
perform adjustments outlined in this manual.
3.4 TESTING UNDER LOAD
Apply electrical loads equal to about 50 to 75 percent
of the unit's rated wattage/amperage capacity.
Let the unit run at least 30 minutes with load applied.
During this part of the test, check that the unit is not
running excessively hot and that adequate cooling air-
flow is available. You must not allow the unit to over-
heat during prolonged operation.
NOTE:
The generator engine is equipped with a high
coolant temperature switch. The switch has normal-
ly open (N.O.) contacts. When the engine coolant
temperature is too high, switch contacts close, and
the engine shuts down automatically.
GENERAC RECOMMENDS THAT YOU TEST THE
GENERATOR FOR ADEQUATE COOLING.
◆
Section 3 – Post-installation Start-up Checks
QUIETPACT™ 65D Recreational Vehicle Generator
CHECKS