


34
www.ferrisindustries.com
Troubleshooting, Adjustment & Repair
B
A
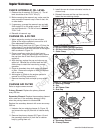
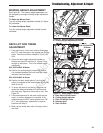
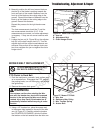
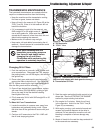
Figure 23. Lift Rod Clevis Adjustment
A. Clevis, 1/2-20
B. 1/2-20 Jam Nut
C. Cotter Pin
D. Clevis Pin
E. Rear Deck Lift Rod
D
C
E
DECK LEVELING ADJUSTMENT
NOTE: Before adjusting the deck level, the deck lift
rod timing must be checked and/or adjusted.
1. Park machine on a flat, level surface. Disengage
the PTO, stop the engine, engage the parking
brake, and remove the key from the ignition. Rear
tires must be inflated to 15 psi (103 kPa);
2. Crank the deck height adjustment handle so
that the rear deck lift rod lever (A, Figure 21) is
straight up and down. This is the middle height
adjustment.
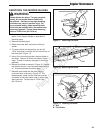
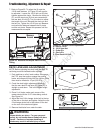
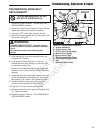
3. Place 2 x 4 blocks under each corner of the
mower deck with the 3-1/2” sides being vertical.
See Figure 24.
4. Adjust the front 3-link hanger chain bolt to the top
of the slot on the deck and tighten. Adjust the rear
5-link hanger chain bolt to the bottom of the slot
on the rear of the deck and tighten.
5. Remove the blocks from under the deck.
Figure 24. 2x4 Position
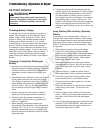
WARNING
Mower blades are sharp. For your personal
safety, do not handle mower blades with bare
hands. Careless or improper handling of
blades may result in serious injury or death.
7. Refer to Figure 23. To adjust the lift rods the
1/2-20 steel clevises (A, Figure 23) will need to
be adjusted. Loosen the 1/2-20 jam nut (B) that
tightens against the clevis. Remove the cotter pin
(C), and the clevis pin (D) that are connected to
the rear deck lift rod (E). Turn the clevis to adjust
the length of the rod. Reinstall the clevis pin and
the hair pin. Tighten the 1/2-20 jam nut. Measure
and record the distance between the lift pivots
and the rod pivots. Repeat this process until the
measurements are equal.
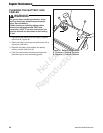
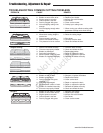
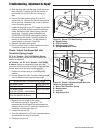
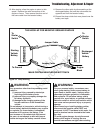
Measure
Second
Measure
First
Figure 22. Measure and Adjust Deck Lift Rod
Timing
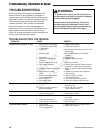
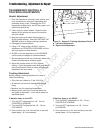
A
A
A
Figure 25. Measuring the Blade Height
Not for
Reproduction