


26
www.ferrisindustries.com
CHECK HYDRAULIC OIL LEVEL
1. Observe the oil reservoir (B, Figure 11). The oil
level should be at the “FULL” line (C).
2. Before removing the reservoir cap, make sure the
area around the reservoir cap is free of dust, dirt,
or other debris.
3. If necessary, unscrew the reservoir cap and add
SAE straight 20 or 30 weight motor oil. DO NOT
use multi-grade oils. Fill until oil level reaches
“FULL” line.
4. Reinstall oil reservoir cap.
CHANGE OIL & FILTER
1. Warm engine by running for a few minutes.
(Refer to the engine operator’s manual for oil &
filter replacement instructions.)
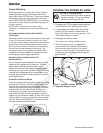
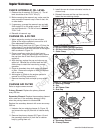
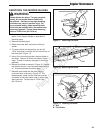
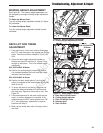
2. Remove the oil drain hose (A, Figure 12) from the
cable clamp (C) on the back left-hand side of the
engine deck and route over the back of the engine
deck as shown in Figure 12.
3. Place a small pan under the oil drain hose to
catch the oil. Using the appropriate tools, remove
the cap from the oil drain hose (A) and drain the
engine oil.
4. After draining, replace the cap and wipe up any
spilled oil. Reinstall the oil drain hose into the
cable clamp to retain the hose during normal
operation.
5. Place an absorbent shop cloth under the engine
oil filter. Remove the engine oil filter and replace
with a new one.
6. Add engine oil (Refer to the engine operator’s
manual for oil filling instructions.)
7. Remove the shop cloth and wipe up any spilled
oil.
CHANGE AIR FILTER
Refer to engine owners manual.
Primary Element: Replace the primary element
every 250 hrs.
Secondary Element: Replace the secondary element
with a new one, if the secondary element is dirty
when the primary element is checked OR
Replace the secondary element with a new one every
500 hrs.
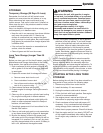
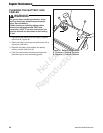
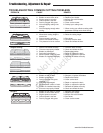
1. Unfasten the two retaining clamps (A, Figure 13)
and remove the cap (B) from the air cleaner body
(C.)
2. Remove the primary element (B, Figure 14) and
the secondary element (A) from the air cleaner
body by pulling them out.
Regular Maintenance
A
D
B
C
Figure 13. Changing the Air Filter
A. Retaining Clamps
B. Cap
C. Air Cleaner Case
D. Dust Cap
A
B
Figure 14. Air Cleaner Elements
A. Secondary Element
B. Primary Element
3. Install the new air cleaner elements into the air
cleaner body.
4. Reinstall the case and the cap then securely
fasten the two retaining clamps.
Figure 12. Engine Oil Drain
A. Oil Drain Hose (Storage Position)
B. Oil Drain Hose (Draining Position)
C. Cable Clamp
C
A
B
Not for
Reproduction