


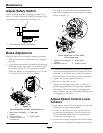

Maintenance
speed control lever in the neutral position. The
operator does not need to be in the seat to start
the engine.
Try to start with operator in seat, parking
brake disengaged, PTO disengaged and speed
control lever in the neutral position - starter
must not crank.
Try to start with operator in seat, parking brake
engaged, PTO engaged and speed control lever
in the neutral position - starter must not crank.
Try to start with operator in seat, parking brake
engaged, PTO disengaged, and the speed
control lever forward (out of neutral), starter
must not crank.
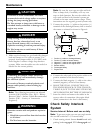
2. Check the kill circuits. Run engine at one-third
throttle, disengage parking brake and raise off
of seat (but do not get off of machine) engine
must initiate shutdown after approximately 1/2
second has elapsed (seat has time delay kill switch
to prevent cut-outs on rough terrain).
Run engine at one-third throttle, engage PTO
and raise offof seat (but do not get off of
machine) engine must initiate shutdown after
1/2 second has elapsed.
Note: If machine does not pass any of these tests,
do not operate. Contact your authorized EXMARK
SERVICE DEALER.
Important: It is essential that operator safety
mechanisms be connected and in proper
operating condition prior to use for mowing.
Check for Loose Hardware
Service Interval: Before each use or daily
1. Stop engine, wait for all moving parts to stop, and
remove key. Engage parking brake.
2. Visually inspect machine for any loose hardware
or any other possible problem. Tighten hardware
or correct the problem before operating.
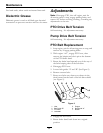
Service Air Cleaner
Service Interval: Every 50 hours—Service
the air cleaner. (May
need more often under
severe conditions. See
the Engine Owner’s
Manual for additional
information.)
1. Stop engine, wait for all moving parts to stop, and
remove key. Engage parking brake.
2. Tilt hopper up to gain access to the air cleaner.
3. Loosen retaining clips and remove air cleaner
compartment cover.
4. Remove paper element. Check the condition
of the paper element. Replace if dirty, bent or
damaged.
5. Check the condition of the inner element. Replace
whenever it appears dirty, typically every other
time the paper element is replaced. Clean the base
around the inner element before removing, so
dirt does not get into the engine.
6. Do Not wash or use pressurized air to clean
paper element or inner element.
7. Reinstall elements. Position the cover so that the
rubber dust ejector is pointing downward and
secure with retaining clips.
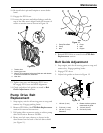
Change Engine Oil
Service Interval: After the rst 5 hours
Every 100 hours (May
need more often under
severe conditions.)
1. Stop engine, wait for all moving parts to stop, and
remove key. Engage parking brake.
2. Drain oil while engine is warm from operation.
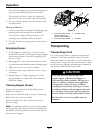
3. Tilt hopper up to gain access to the engine area.
4. The oil drain valve is located on right hand side
of engine at the back of the unit. Remove two
nuts near right hand drive tire and swing out the
fuel tank. Install oil drain hose, supplied in the
literature pack, onto oil drain valve. Place pan
under machine to catch oil. Open valve to allow
oil to drain and then close valve
5. Replace the oil lter every other oil change. Clean
around oil lter and unscrew lter to remove.
Before reinstalling new lter, apply a thin coating
of oil on the surface of the rubber seal. Turn
lter clockwise until rubber seal contacts the lter
adapter then tighten lter an additional 1/2 to
3/4 turn.
25