


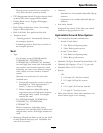


Operation
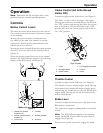
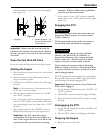
Figure 10
1. Latching position 3. Non-latching position
2. Transport lock control
Electronic Control Unit Malfunction
Indicator
Kohler EFI Units Only:
The electronic control unit (ECU) continuously
monitors operation of the EFI system. If a problem
or fault within the system is detected, the malfunction
indicator light (MIL) is illuminated. The MIL is the
light located in the right console panel to the right of
the throttle control. Follow the troubleshooting steps
outlined in the Kohler engine operator’s manual if the
MIL is illuminated.
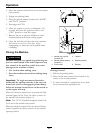
Pre-Start
Fill fuel tank on level ground. For best results use
only clean, fresh regular grade unleaded gasoline with
an octane rating of 87 or higher.
Important: Never use methanol, gasoline
containing methanol, gasohol containing more
than 10% ethanol, premium gasoline, or white
gas because the fuel system could be damaged.
Do Not add oil to gasoline.
Do Not overll fuel tank. Fill the fuel tank to the
bottom of the ller neck. The empty space in the
tank allows gasoline to expand. Overlling may result
in fuel leakage or damage to the engine or emission
system.
Make sure you understand the controls, their
locations, their functions, and their safety
requirements.
Refer to the Maintenance section and perform all the
necessary inspection and maintenance steps.
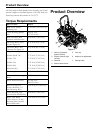
Operating Instructions
Raise the Rollover Protection System
(ROPS)
Important: The roll bar is an integral and
effective safety device. Keep the roll bar in the
raised and locked position when operating the
mower. Lower the roll bar temporarily only when
absolutely necessary.
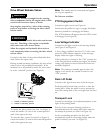
1. The knob must be completely latched with the
tabs interlocking as shown in
Figure 11 to lock
the roll bar in the raised, operate position.
2. Apply forward pressure to the upper hoop of the
roll bar.
3. Pull the knob and rotate 90° to hold in the
unlatched position to lower the roll bar.
4. To return to the operate position, raise the roll
bar, and then rotate knobs 90° so that the tabs
interlock partially. Apply forward pressure to the
roll bar upper hoop and observe that the knobs
return to the completely latched position.
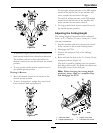
Figure 11
1. Roll bar upper hoop
2. Knob in “latched” position
3. Pull knob to unlatch
4. Rotate 90° to hold unlatched
5. Knob in “unlatched” position
5. Make sure the knobs are fully engaged with the
roll bar in the raised position. The upper hoop of
the roll bar may need to be pushed forward or
24