


Maintenance
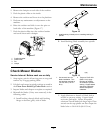
WARNING
Incorrect installation of the blade or
components used to retain the blade can
be dangerous. Failure to use all original
components and assembled as shown could
allow a blade or blade component to be
thrown out from under the deck resulting in
serious personal injury or death.
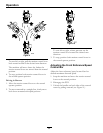
Always install the original Exmark blades,
blade bushings, and blade bolts as shown.
Check Safety Interlock
System
Service Interval: Before each use or daily
CAUTION
If safety interlock switches are disconnected
or damaged the machine could operate
unexpectedly causing personal injury.
• Do not tamper with the interlock switches.
• Check the operation of the interlock switches
daily and replace any damaged switches
before operating the machine.
Understanding the Safety Interlock System
The safety interlock system is designed to prevent the
mower blades from rotating unless:
• The right side motion control lever is moved to
the center, operating position.
• The blade control switch (PTO) is pulled on.
The safety interlock system is designed to stop
the mower blades if you move or release the right
side motion control lever into the PTO disengage
position.
• The right side motion control lever is moved to
the center, operating position, the parking brake
is engaged, and the blade control switch (PTO) is
pulled on.
Checking the Safety Interlock System
1. Start the engine.
2. Set the parking brake.
3. Move the motion control levers forward.
The engine should initiate shutdown after
momentary pause.
4. Start the engine and release the parking brake.
5. Move the right side motion control lever to the
center, operating position.
6. Continue holding the right side motion control
lever in the center, operating position and pull up
on the blade control switch (PTO) and release.
The clutch should engage and the mower blades
begin rotating.
7. Move or release the right side motion control
lever into the neutral position. The blades
should stop rotating and the engine should
continue running.
8. Push the blade control switch down and move
the right side motion control lever to the center,
operating position.
9. Continue holding the right side motion control
lever in the center, operating position and pull up
on the blade control switch (PTO) and release.
The clutch should engage and the mower blades
begin rotating.
10. Push the blade control switch (PTO) down to the
off position. The blades should stop rotating.
11. With the engine running, pull up the blade control
switch (PTO) and release without holding right
side motion control lever to the center, operating
position. The blades should not rotate.
Check for Loose Hardware
Service Interval: Before each use or daily
1. Stop engine, wait for all moving parts to stop, and
remove key. Engage parking brake.
2. Visually inspect machine for any loose hardware
or any other possible problem. Tighten hardware
or correct the problem before operating.
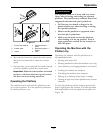
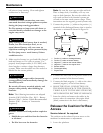
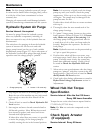
Service Air Cleaner
Service Interval: Every 250 hours—Replace
the primary air cleaner
element — check
secondary air cleaner
element; replace if dirty.
(May need more often
under severe conditions.
See the Engine manual for
additional information.)
Every 500 hours—
Replace the secondary
air cleaner element. (May
28