


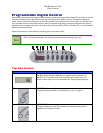


2002 @ Home Hot Tubs
Owner’s Manual
8. Tip the system onto one side. (The system will have some water remaining, which will add to the weight). Be
sure to have enough people available to safely lift the weight of your system. Do not tip system onto
equipment bay side.
Close all jets, by turning jet faces counter clockwise.
9. Put on your protective goggles in order to protect eyes from air, water, antifreeze or debris exiting the jets or
drains.
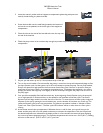
10. Insert the hose of a high-pressure air blower into the filter element fitting. Some models may have 2 filters.
Begin with the left-hand filter fitting, which will help evacuate water from the circulation pump system. Then
proceed to the right-hand filter fitting. When using air blower on single-filter systems or the right-hand fitting
on dual filter systems, rotate each of the jet faces clockwise to open and counter-clockwise to close again. Do
this to each jet face, one jet at a time. Be careful, as water will be coming out of each jet fitting as you
perform this maneuver. Perform this operation, until no more water is coming from the jets.
11. Remove jet faces and insert the hose of a high-pressure air blower into each jet fitting. Continue this process,
until no more water comes out of any jet fitting or drain fitting and you no longer hear water gurgling within
the plumbing. Place all jet faces in a plastic bag and set aside until you are ready to use your system again.
12. Remove both bleeder valves from the top of the filter canister area. Place hose of a high-pressure air blower
into the rear-most bleeder fitting first. Confirm that water mist is blowing from one or both of the circulation
system return jets in the footwell of the system. You may also get some water mist blowing from the filter
canister. Repeat this process with the front-most bleeder fitting. Confirm that water mist is blowing from the
drain fittings of the jet pumps.
13. Place the hose of a commercial grade, wet-vacuum over each jet fitting, bleeder valve fitting, and drain fitting
to draw out as much remaining standing water as possible.
Remove drain hose bib assembly from the outside bottom of the system.
14. Use the wet-vacuum to remove standing water from the pumps and any other fittings within the equipment
compartment.
15. Once you are sure that all water is evacuated from the plumbing and equipment of the system, put the system
back down in its normal position and repeat Step 10 and Step 11
16. Read all Directions and Safety Precautions on the Swimming Pool or Recreational Vehicle antifreeze bottle
before opening and using. Ensure that it is non-toxic and safe for this use. Beware of and follow all safety
precautions.
17. Using a long funnel, begin pouring non-toxic swimming pool or recreational vehicle water system antifreeze
into the filter canister fittings, bleeder valve fittings and jet fittings of your system. Continue adding antifreeze
until it comes out of the drain fittings or from the opening you are pouring it into. You must complete this
task for every jet fitting in the system. Some of the antifreeze will seep into the system from the drain or jet
fittings, which is okay, the goal is to have anti-freeze collect in the areas of the plumbing that would normally
trap water. Use the funnel to also place antifreeze into the pump housing(s).
When pouring antifreeze into the rear-most bleeder valve fitting, you may see antifreeze pouring from
one or both of the circulation system return fittings.
DO NOT USE AUTOMOTIVE COOLING SYSTEM ANTIFREEZE IN YOUR SYSTEM. IT IS TOXIC
AND HARMFUL TO HUMANS AND ANIMALS. CHECK WITH YOUR LOCAL SPA DEALER OR
RV DEALER TO PURCHASE NON_TOXIC
ANTIFREEZE THAT IS COMPATIBLE WITH
DRINKING WATER SYSTEMS!
18. Replace all equipment access panels onto the system.
17