


23
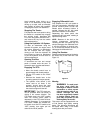
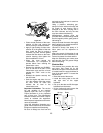
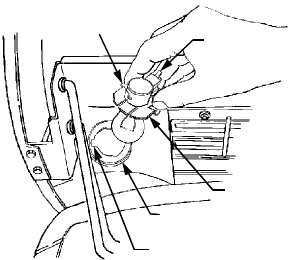
Headlight Bulb Replacement
Replace headlight bulbs as follows:
(See Figure 20)
1. After noting which wire connects
to each terminal, unplug the wire
harness leads from the headlight
socket terminals.
2. Rotate the socket assembly as
follows to remove from the
reflector housing:
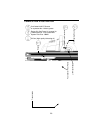
Figure 20
• Left headlight — appoximately 1/4
turn counterclockwise.
• Right headlight — approximately
1/4 turn clockwise.
3. Push the bulb inward and turn
counterclockwise to remove from
the socket.
4. Align the post of the bulb base
with the notch in the socket, then
push the bulb inward and turn
clockwise to lock
5. With the terminals pointing
upward, align the tab of the
socket with the notch of the
reflector. Push the socket inward
and turn as follows to lock:
• Left headlight-1/4 turn clockwise.
• Right headlight-1/4 turn counter-
clockwise.
6. Connect the wire harness leads to
the appropriate socket terminals.
Tail Light Bulb Replacement
Each tail light assembly has two
lightbulbs. Access the back side of the
tail lights from under the rear fender.
NOTE: Because of the close proximity
of the fuel tank, caution should be
taken when removing the tail light
sockets from the reflector housings.
The bulbs can be pulled from the
sockets and dropped into the reflector
housing, requiring removal of the
reflector housing to retrieve the bulb.
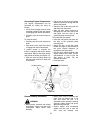
Replace a tail light bulb as follows:
• Turn the light socket counterclock-
wise to align the socket tabs with
the notches in the tail light reflector.
• Once aligned, carefully pull light
socket out of the tail light reflector.
• Pull the light bulb from the socket
and replace with like part.
• Align the tabs of the socket with the
notches in the reflector and carefully
insert the socket. Turn the socket
fully clockwise to lock in place.
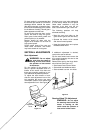
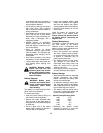
Tire Inflation
Keep the tires inflated to the
recommended pressure. Improper
inflation will affect tire life and operator
comfort, and also could affect the level
of the mower deck and quality of cut.
See the tire side wall for proper
inflation range.
Ensure that the valve caps are
securely tightened in place to prevent
air loss and to protect the valve core.
Do not overload the tractor tires by
mounting equipment on the tractor
which exceeds the load capacity of the
size of the tires on the tractor.
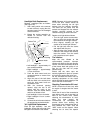
Checking Transmission Oil Level
NOTE: Check the oil level only while
the engine is stopped and the tractor
is level.
Check the oil level of the transmission
case before each use to see that it is
filled to the correct level. Before
checking the transmission oil level,
clean the area around the
Transmission Oil Fill/Dipstick to
prevent debris from entering the
transmission case. Always keep the oil
level between the “FULL” and the
“ADD” marks on the dipstick. When
checking the oil level, the dipstick
Terminals
Socket
Reflector Housing
Reflector Notch
Socket Tab