


14
INITIAL ADJUSTMENTS
1. Disconnect the spark plug wire.
2. Check that all nuts, bolts and screws are tight.
3. Check the tension of the deck drive belts:
a. Remove the deck cover shield and engage
the blade clutch.
b. Make sure the belts clear the belt guides by
1/8" to 1/4".
c. The tension of the deck drive belts should
be adjusted so that a ten-pound pull
between two pulleys deflects each belt
about 1/2" (See Figure 19 page 19). Do not
overtighten these belts. The blade clutch
should engage with only moderate force.
d. Replace the deck cover shield and
disengage the blade clutch.
4. The tension of the transmission drive belt should
be adjusted so that a five-pound pull between
the engine traction drive pulley and the
transmission drive pulley deflects the belt about
3/16". (See Figure 20 page 20)
5. The two drive wheel belts are self-adjusting.
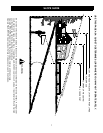
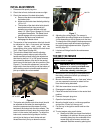
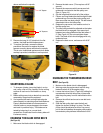
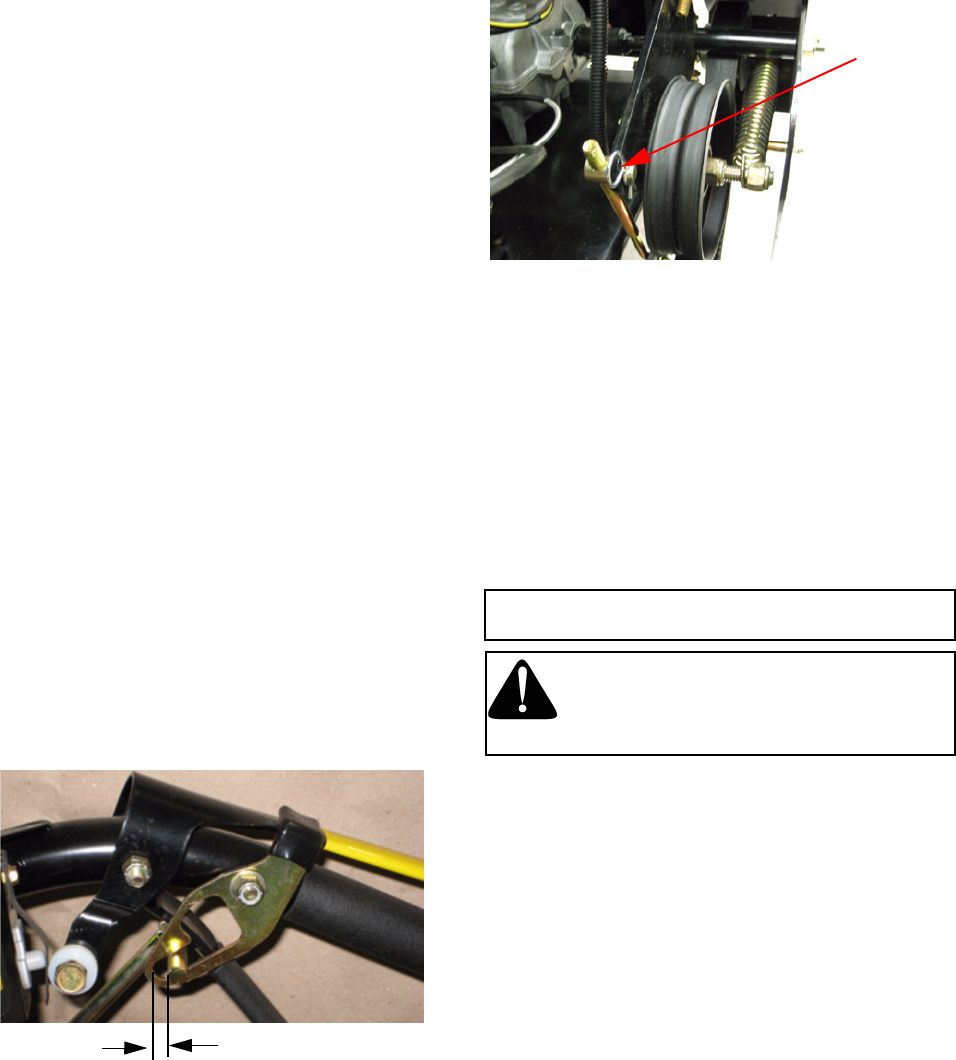
6. The steering control rods on each side of the
handle assembly should initially be adjusted so
that there is about a 1/4" to 3/8” space between
the rod and the bottom of the slot in the neutral
latch lever with the latch in the drive position (See
Figure 6.) To make this adjustment, remove the
large hairpin from the swivel joint at the bottom of
each steering control rod and thread the swivel
joint up or down the rod as needed.
Figure 6
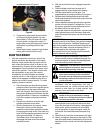
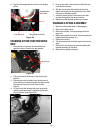
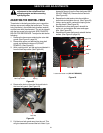
7. The brake rods (above each drive wheel) should
be adjusted so that when the steering/brake
levers are squeezed and the mower is pulled
backward, the brakes lock the drive wheels. The
machine should roll freely when the neutral latch
lever is in the neutral lock position. To adjust the
brake rods, remove the large hairpin from the
swivel joint at the top of each brake rod and
thread the swivel joint up or down the rod as
needed.
Figure 7
8. Adjusting the cutting height: The mower is
shipped with the cutting height set at 3 inches ±1/
4 inch depending on the air pressure in the tires.
To change the cutting height, blade spacers and/
or caster spacers must be moved according to
the cutting height adjustment table. (Figure 24
and 25, page 22)
9. Lubricate all fittings listed in the maintenance
section.
TO START THE MOWER
IMPORTANT: First time operators should refer to the
procedure stated on page 5.
WARNING: Never run the engine
indoors or in a poorly ventilated area.
Engine exhaust contains carbon
monoxide, a deadly, odorless gas.
1. Make certain you thoroughly understand all of
the safety precautions before you attempt to
operate this machine.
2. Move the mower outdoors to a “test area” where
you can operate the mower for about half an
hour without being disturbed.
3. Shift the transmision to neutral (N) position.
4. Disengage the blade clutch.
5. Place the neutral latch levers in the neutral lock
position.
6. Connect the spark plug wire.
7. Open the fuel shutoff valve.
8. Move the throttle lever to a mid range position
and pull the “Choke” all the way out.
9. Put the key in the ignition switch and turn the
switch on.
10. To start engine using recoil starter:
a. Stand on left side (as viewed from behind
handlebars) of machine. Be sure your feet
are safely away from the underside of the
mower deck and all mower controls are
released. Stabilize mower by placing foot
1/4” to 3/8”
Hair Pin