


39
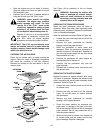
• Place the tractor on a level surface and engage
the parking brake. Stop the tractor engine and
remove the ignition key.
• Clean the area around the oil filler cap to
prevent debris from entering the crankcase.
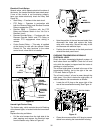
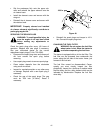
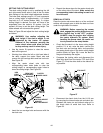
Refer to Figure 45.
• Turn the oil filler cap a quarter turn counter-
clockwise to remove from the right valve cover.
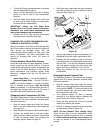
• SLOWLY pour oil into the crankcase until the
oil level reaches the “FULL” mark on the
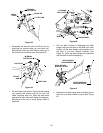
dipstick. Refer to Figure 46.
• Insert the oil fill cap into the valve cover and
turn clockwise until fully tightened. Reinsert the
dipstick into the dipstick tube and push firmly
into the tube.
IMPORTANT: The oil fill cap and dipstick must
always be installed securely in place when the
engine is running. Severe engine damage could
result from failure to do so.
CHANGING THE ENGINE OIL AND FILTER
WARNING: Because the engine is run
prior to draining the oil, the engine may
be hot. Use caution to avoid burning
yourself on engine surfaces.
The engine oil and oil filter should be changed after
every 100 hours of operation. Refer to the LUBRI-
CATION TABLE in the MAINTENANCE SECTION
of this manual for the quantity of oil needed, and to
determine the proper type of oil to use for the condi-
tions under which the engine will be operated.
Run the engine for a few minutes to allow the oil in
the crankcase to warm up. Warm oil will flow more
freely and carry away more engine impurities. Use
care to avoid burns from hot oil. While the engine
oil is warm, proceed as follows:
• Place the tractor on a level surface and engage
the parking brake. Stop the tractor engine and
remove the ignition key.
• Clean around the base of the oil filter, the oil
filler cap, and the dipstick tube to prevent
debris from entering the crankcase.
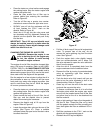
• Remove the dipstick and oil fill cap from the
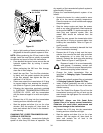
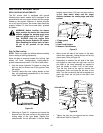
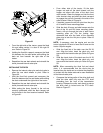
engine. Refer to Figure 47.
• Locate the engine drain valve on the rear of the
engine (See Figure 47). Place a suitable
container below the open end of the drain valve
to collect the old oil.
Figure 47
• Pull the oil drain cap off the end of engine drain
valve. To prevent loss of the cap, do not
remove the cap’s retaining ring from the drain
valve. See Figure 47.
• Push the engine drain valve slightly inward;
then turn counterclockwise until it stops. Pull
the valve outrward to open the valve and drain
the oil from the engine.
• Allow the old oil to completely drain from the
engine crankcase into the container below.
• Remove the filter by turning it counterclockwise
using an automotive type filter wrench to
loosen. See Figure 47.
• Push the drain valve fully inward until you are
able to turn the valve clockwise to lock in the
closed position. Refer to Figure 47.
• Clean any oil from the end of the drain valve
and push the cap onto the valve.
• To assure a continuous flow of oil to all critical
lubrication points within the engine, pour some
new oil into the treaded center hole of the filter
and allow time for the oil to be absorbed into
the filter material.
• Apply a light coating of clean oil on the gasket of
the new oil filter. Thread the filter on by hand
until the gasket contacts the filter mounting sur-
face, then tighten the filter an additional 2/3 to 1
turn.
• Refill the crankcase to the "FULL" mark on the
dipstick with the appropriate type oil.
• Reinstall the oil fill cap and dipstick.
ENGINE
DRAIN
VALVE
OIL
DRAIN
CAP
OIL
FILTER
OIL
FILL
CAP
OIL
DIPSTICK