


28
NOTE: Proper removal of the drive belt requires the
removal of several tractor components. Read through
the following procedure prior to attempting it to
determine if you feel you could successfully complete it.
If you don’t, see your Cub Cadet dealer to have the belt
changed.
IMPORTANT:
Note the routing of the lower drive belt
around all the pulleys and the belt keepers (if present)
BEFORE performing the following steps.
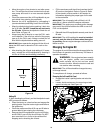
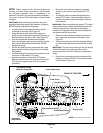
• Locate the fixed v-idler pulley found on the left
underside of the frame. See Figure 30.
• Grasp the belt on both sides of the pulley and
gently move it toward the left frame rail allowing it to
unseat itself from the fixed v-idler. See Figure 30.
• Pivot the double-idler bracket forward slightly
before removing the idler extension spring from the
stud and the double-idler bracket itself. Do NOT
discard the spring.
• Roll the drive belt out from around both the v-idler
pulley and the flat idler pulley found on the double-
idler bracket.
• Carefully unplug the tractor’s wire harness from the
connector on the electric PTO clutch.
• Note the orientation of the electric PTO clutch.
Remove the hex bolt from the center of the electric
PTO clutch and gently lower it off of the engine
crankshaft.
• Be careful not to lose any washers or spacers
which may be found on top of the electric PTO
clutch.
• The engine pulley is located directly above the
electric PTO clutch. Lower the engine pulley far
enough to be able to remove the upper drive belt
from around it.
IMPORTANT:
When remounting the electric PTO clutch,
make certain that is properly oriented against the anti-
rotation bracke prior to securing it to the engine’s
crankshaft. Torque the center hex bolt to between 38
foot-pounds and 50 foot-pounds.
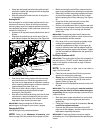
• Remove the drive belt by feeding it from front to
rear, toward the hydrostatic transmission. See
Figure 30.
• Continue removing the drive belt by gently lifting it
off of the transmission pulley and over the cooling
fan.
IMPORTANT:
The fins on the cooling fan are only slightly
flexible. Be careful not to damage the fan when
removing the drive belt from around the transmission
pulley.
• Reroute the new belt around the pulleys and belt
keepers, if present, EXACTLY as the old one was
routed. Refer to Figure 30.
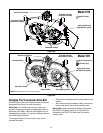
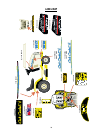
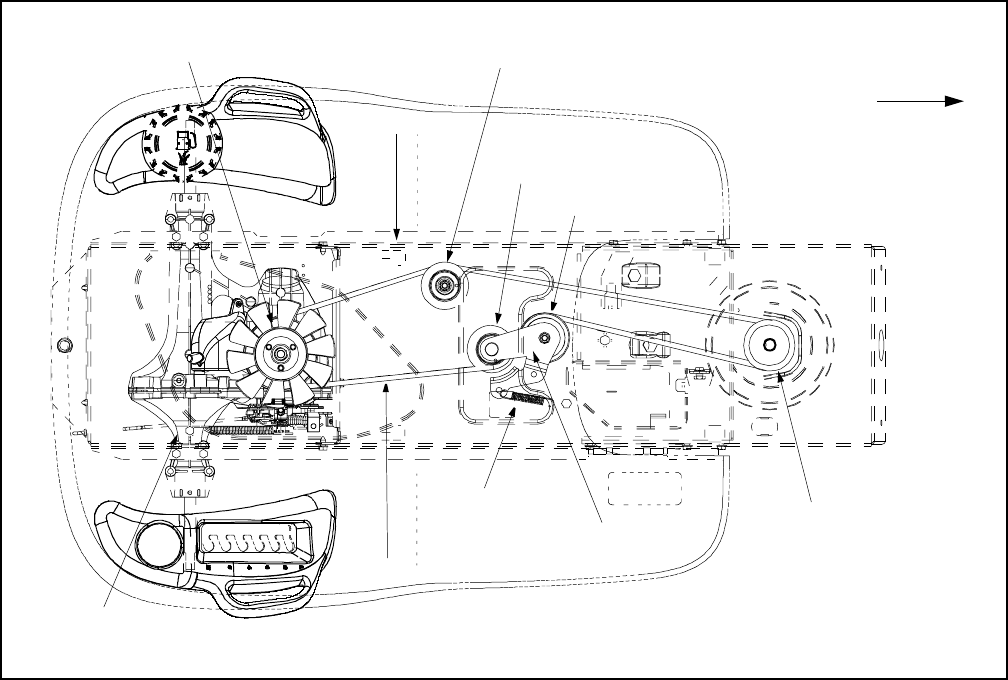
Figure 30
FRONT OF TRACTOR
Fixed V-idler Pulley
Transmission Pulley
Engine Pulley
Hydrostatic
Double-Idler Bracket
V-idler Pulley
NOTE:
View shown from above tractor.
Idler Extension Spring
Drive Belt
Left Frame Rail
Flat idler Pulley
(Beneath Cooling Fan)
Transmission