


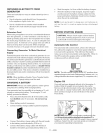


GENERAL RECOMMENDATBON$
The warranty of the generator does not cover items that
have been subjected to operator abuse or negHigence. To
receive full vaHuefrom the warranty, operator must maintain
the generator as instructed in this manual
Some adjustments will need to be made periodically to
maintaining your generator.
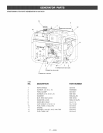
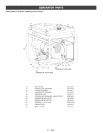
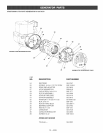
GENERATOR MAINTENANCE
Your generator shouHdbe kept dean and dry at aHtimes.
The generator shouHd not be stored or operated in
enviroments that incHudesexcessive moisture, dust or any
corrosive vapors. Ifthese substances are on the generator,
dean with a cloth or soft bristHebrush. Do not use a garden
hose or anything with water pressure to cHeanthe genera-
tor. Water may enter the cooling air slots and could possi-
bly damage the rotor, stator and the internal windings of the
gen head.
All adjustments in the Maintenance section of this manual
should be made at least once each season.
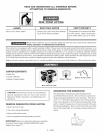
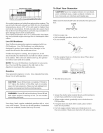
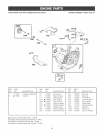
ENGINE MAINTENANCE
Changing Engine Oim
For a new engine, change oil after the first 5 hours of
operation. Thereafter, change oil after every 50 hours of
operation.
Change the oil while the engine is still warm. The oil will
flow freely and carry away more impurities. Make sure the
engine is level when filling, checking, or changing oil.
Change the oil as follows:
To keep dirt, grass clippings, etc., out of the engine,
clean the area around the drain plug and dipstick
before removing it.
Remove the oil drain plug and dipstick. Tilt the engine
slightly towards the oil drain to obtain better drainage.
Be sure to allow ample time for complete drainage.
Reinstall the drain plug. Make sure it is tightened
securely.
Fill the crankcase with new oil of the proper type, to
the Full mark on the dipstick. Always check the level
with the dipstick before adding more oil.
Reinstall the oil fill cap or plug and tighten securely.
FULL_
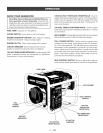
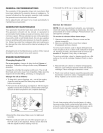
Service Air Cleaner
NOTE: Do not use petroleum solvents, e.g., kerosene,
which will cause the cartridge to deteriorate. Do not use
pressurized air to clean cartridge. Pressurized air can
damage the cartridge.
To service air cleaner follow these steps:
1. Unscrew cover screws. Remove cover and air
cleaner assembly.
2. Remove cartridge from cover, then retainer
(if equipped) and pre-deaner.
To service pre-deaner, wash in liquid detergent and
water. Squeeze dry in a clean cloth. Saturate in engine
oil. Squeeze in clean, absorbent cloth to remove all
excess oil. Replace if very dirty or damaged.
To service cartridge, clean by tapping gently on a flat
surface. Do not oil cartridge. Replace if dirty or dam-
aged.
3. Reassemble pre-deaner or retainer (if equipped.)
Place in cover with pre-cleaner mesh side toward
cartridge. Place cartridge in retainer in cover.
4. Push cover and air cleaner assembly squarely onto
base (tabs must be in slots, if equipped) and hold
firmly. Tighten cover screws securely.
Do not clean engine with a forceful spray of water
because water could contaminate fuel system. With
a brush or cloth clean finger guard after every use to
prevent engine damage caused by overheating.
14 -- ENG