


, ,,,,,,,
ASSEMBLY
HOW TO SET UP YOUR TRACTOR
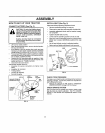
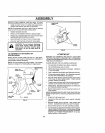
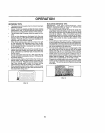
CONNECT BATTERY (See Fig, 2)
• Lift hood to raised position
• Open terminal access doors, remove terminal protec-
tive caps and discard.
• tf lhls battery Is put into service after month and year
indicated an label (label located between terminals)
charge battery for minimum of one hour at 6-10 ampso
,, First connect RED baltery cable to positive (+) battery
terrain al wlth hex bolt, tier washer, lock washBr and hex
nut as shown. Tighten securely.
, Connect BLACK grounding cable te negative (-) bat-
tery terminal with remaining hex bolt, flat washer, lock
washer and hex nut. Tighten securely
,, Close lerminat access doors
Use terminal access doors for:
, Inspection for secure conneclions (Io tighten hard-
ware),
• InspectionIor corrosion
• Testing battery.,
• Jumping (if required),
Periodic charging.
LOCK FLAT
HEX NUT WASHER WASHER
DISCARD TERMINAL NEX
PROTECTIVE CAPS BOLT
TERMfNAL - r {1 _
ACCESS
DOOR
POSEWE
(REDt
CABLE
NEGATIVE
(BLACK)
CABLE
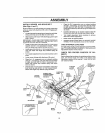
INSTALL SEAT (See Fig. 3)
Adjust seal before tightening adjustment knob.
• Remove cardboard packtng on seat pan
• Place seal on sea! pan and assemble shoulder bolt.
• Assemble adjustment knob and flat washer loosely.
DO notlighten,
. Tighten shoulderbott securely.
• Lower seat into operating position and sil on seat.
• Slide seat unlif a comfortable position is reached which
allows you lo press clutch/brake pedal all the way
down.
• Get off seat without moving its adjusted position
• Raise seat and tighten ad)ustment knob securely..
SEAT PAN
SHOULDER
BOLT
ADJUSTMENT
KNOB
FIG. 3
FLAT WASHER
CHECK TIRE PRESSURE
The tires an your tractor were overlnflated at the factory for
shipping purposes Cprrect tire pressure is important for
best cutting performance
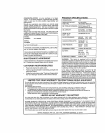
• Reduce tire pressure to PSI shown in "PRODUCT
SPECIFICATIONS" on page 3 of this manual
CHECK BRAKE SYSTEM
After you learn h_w to operate your tractor, check to see
thai the brake is properly adjusted° See "TO ADJUST
BRAKE" in the Service and Adjustments section of this
manual.
FIG. 2