


2
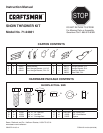
Call 1-866-576-8388 for missing parts or assembly help
DO NOT RETURN TO STORE
USE THE FOLLOWING INSTRUCTIONS
IN PLACE OF STEPS #1 THRU #46 IN THE
SNOW THROWER MANUAL.
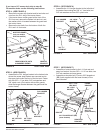
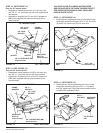
FIGURE 2a RIGHT SIDE VIEW
STEP 2: (SEE FIGURE 2a or 2b)
• Attach the R.H. side plate (supplied with the kit) to the
tractor. If you removed bolts as shown in gure 1a,
install two 3/8" x 1" hex bolts and 3/8" lock washers as
shown in gure 2a. If you removed nuts as shown in
gure 1b, install two 3/8" x 1" carriage bolts, 3/8" lock
washers and 3/8" nylock nuts as shown in gure 2b.
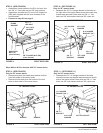
NOTE: If you remove the side plates from the tractor, be
sure to reassemble bolts and nuts back into the frame.
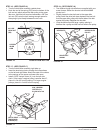
SIDE PLATE (L.H.)
supplied with snow thrower
STEP 3: (SEE FIGURE 3)
• Attach the L.H. side plate (supplied with the snow
thrower) to the left side of the tractor frame in the
same manner as the R.H. side plate.
FIGURE 3 LEFT SIDE VIEW
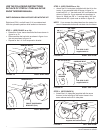
Right hand (R.H.) and left hand (L.H.) are determined
from the operators position while seated on the tractor.
STEP 1: (SEE FIGURE 1a or 1b)
• Determine if your tractor has bolts like those shown in
gure 1a or 1b.
• Remove either the hex bolts as shown in gure 1a or
the nuts as shown in gure 1b.
• Repeat for the L.H. front suspension bracket.
FIGURE 1a RIGHT SIDE VIEW
REMOVE BOLTS
FRONT SUSPENSION
BRACKET (R.H.)
FRONT SUSPENSION
BRACKET (R.H.)
REMOVE NUTS
FIGURE 1b RIGHT SIDE VIEW
3/8" LOCK
WASHER
3/8" x 1"
HEX BOLT
R.H. SIDE PLATE
supplied with kit
FIGURE 2b RIGHT SIDE VIEW
3/8" NYLOCK NUT
R.H. SIDE PLATE
supplied with kit
3/8" LOCK
WASHER
3/8" x 1"
CARRIAGE BOLT
PARTS SHOWN IN GRAY ARE SUPPLIED WITH THE KIT.