


SERVICE AN
TINE REPLACEMENT
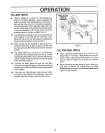
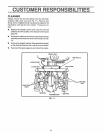
The mini tiller/cultivator is left hand or right hand as
viewed from the operator's position behind the unit
All four tines on this unit are different and cannot be
interchanged. The tines must be properly installed as
shown in figures 12 and 13 or the mini tillerlcultivator will
not function properly
The outside tines may be removed to reduce the tilling
width to about 7 inches, for working close around plants
orin small areas, ifdesired_ When reinstallingthe outside
tines see below.
T$
RIGHT'SIDE
TINES
LEFT SIDE
TINES
HAIRPINS
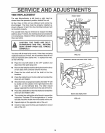
The tines will all wear fairly evenly_ If the tines are being
replaced because of wear, we recommend that all four
tines be replaced at the same time To replace the tines,
do the following:
O Place the shut-off switch to the OFF position and
disconnect the spark plug wire
O Removethe hairpins andthe clevis pinsfromthe tines
on one side of the uriit and remove the tines
O Clean the fine shaft and oil the shaft at the tine
locations.
O Place the inside tine on the tines haft and reinstall the
clevis pin and hairpin.
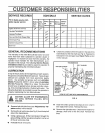
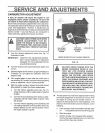
O When the tines are properly installed, the letter"R" will
be visible on the outside of the righFhand tine (the
letter "L" on the left-hand tine). The letter should
appear opposite the smait hole in the side of the tine
O Piacethe outsidetineonthe tine shaft and reinstallthe
clevis pin and hairpin cotter.
® The outside tine cutting tips will all bend in toward the
inside tine The letter "R" or] t he right side or"L" on the
left side should be visible from the outside of the unit.
• Repeat steps on the opposite side of the unit.
O Check to make sure the tines are installed on correct
side of the unit
FIG. 12
PROPERLY INSTALLED RIGHT SIDE TINES
RIGHTSIDE INDICATOR
FIG,, 13
16