


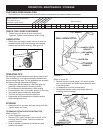


6
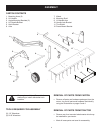
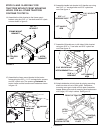
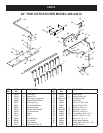
11. Remove two self threading bolts (if present) from
front cross-member of tractor. Assemble bolts through
lower slots in hitch bracket, then reinstall them back
into front crossmember. (Make sure notches at top
of hitch bracket and crossmember are aligned.) See
gure 8.
12. From behind tractor's front crossmember, insert two
3/8" x 1" hex bolts through holes in crossmember
(shown in gure 8) and through upper slots in hitch
bracket. Secure with two 3/8" nylock hex nuts.
13. Go to step 16 on page 7.
FIGURE 6
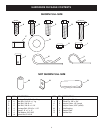
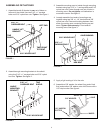
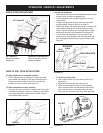
7. Assemble a 5/8" washer onto axle. Insert axle up
through axle bushing. Assemble another 5/8" washer
onto axle and secure with a 1/8" hairpin cotter. See
gure 5.
FIGURE 5
ATTACHING DETHATCHER TO TRACTOR
8. Insert mounting shaft through holes in both mounting
arms. Secure mounting shaft to mounting arms with
two (large) 1/8" hairpin cotters assembled into inside
holes of shaft. See gure 6.
HITCH BRACKET
FRONT
3/8" x 1"
HEX BOLT
3/8" NYLOCK
NUT
SELF THREADING BOLT
SELF THREADING BOLT
FIGURE 8
5/8" WASHER
1/8" HAIRPIN COTTER
MOUNTING
SHAFT
(LARGE) 1/8"
HAIRPIN COTTER
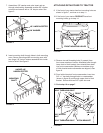
FRONT MOUNTING HOLES
FIGURE 7
9. If the front of your tractor has front mounting holes as
shown in gure 7, continue on to step 11.
10. If the front of your tractor DOES NOT have front
mounting holes, go to step 14.