


10
OPERATION / SERVICE / ADJUSTMENTS
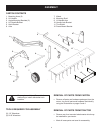
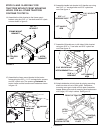
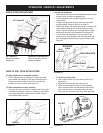
Leveling the dethatcher
• Move tractor with front mounted dethatcher onto a level
surface, such as a drive or garage oor.
• Lower dethatcher from transport position to rest on
level surface.
• Loosen carriage bolts through mounting arms and
angle brackets. (Refer to gure 3 on page 5.)
• Adjust tine shield until spring tines come in contact with
level surface, keeping front and back tines at same
height. Tighten mounting arm carriage bolts on top of
dethatcher shield to lock adjustment. See gure 20.
• If you need more adjustment, try moving the axle
bushing up or down between the mounting arms. Be
sure to retighten the bolts securing the bushing. See
gure 20.
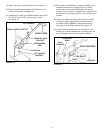
• To replace a spring tine:
a. Use a screw driver to pry the tabs up off of the
spring tine.
b. Remove old the spring tine from the tray.
c. Slide a new spring tine under the locking tabs.
Insert a screw driver and bend down the locking
tabs until the ends of the tabs are bent down
even with the surface of the tray. See gure 20.
FIGURE 21
POCKET
SCREW
DRIVER
AXLE
BUSHING
MOUNTING
ARMS
GROUND
TINE SHIELD
TINES
ANGLE BRACKETS
FIGURE 20
LIFT HANDLE
Raises and lowers
dethatcher.
HANDLE LOCK BRACKET
Locks lift handle in raised
transport position.
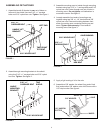
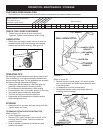
KNOW YOUR DETHATCHER
LIFT HANDLE
HANDLE
LOCK
BRACKET
FIGURE 19
HOW TO USE YOUR DETHATCHER
To raise dethatcher to transport position:
• Pull lift handle back so that stud in handle is pulled
past handle lock bracket. Push down and forward on
handle so that stud falls into notch on handle lock
bracket to lock in position. See gure 19.
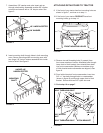
To lower dethatcher to work position:
• Pull back and up on handle to release stud from notch
in handle lock bracket. Lower by holding up on handle
and pushing forward, allowing stud to pass through
lock bracket. See gure 19.
NOTCH
STUD