


CUSTOMER RESPONSIBILITIES
CARE & MAINTENANCE TASK WHEN TO PERFORM
Check for loose fasteners and parts
Check for damaged or worn parts
Inspect and clean unit and labels
GENERAL RECOMMENDATIONS
The warranty on this unit does not cover
items that have been subjected to oper-
ator abuse or negligence. To receive full
value from the warranty, the operator
must maintain unit as instructed in this
manual. Various adjustments will need
to be made periodically to properly
maintain your unit.
Before each use
Before each use
After each use
CHECK FOR DAMAGED OR
WORN PARTS
Contact Sears Service Center for re-
placement of damaged or worn parts.
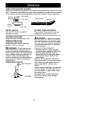
• ON/OFFSwitch - Ensure switch func-
tions properly by moving the switch to
the OFF position. Make sure motor
stops; then restart motor and continue.
AFTER EACH USE
BEFORE EACH USE
CHECKFORLOOSE
FASTENERS AND PARTS
• BlowerTube
• Nozzle
INSPECT AND CLEAN UNIT & LABELS
Stop unit and unplug extension cord.
• Inspect complete unit for loose or
damaged parts. Clean the unit using a
damp cloth with a mild detergent.
• Wipe off unit with a clean dry cloth.
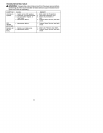
USER REPLACEABLE SERVICE PARTS
REPLACEMENT PART
Blower Tube and Nozzle
Gutter Kit
Safety Glasses
Extension Cord
PART NUMBER
530403682
71-79970
71-85707
71-85709
d_WARNING: Perform the follow-
ing steps after each use:
• Stop unit and disconnect from the
power source.
• Store the unit in a stable location.
• Store unit with all guards in place.
Position unit so that any sharp object
cannot accidentally cause inury.
• Store unit well out of the reach of chil-
dren.
Prepare unit for storage at the end of
the season or if it will not be used for
30 days or more.
BLOWER STORAGE
• Disconnect from the power source.
• Clean the entire unit.
• Inspect the blower and all tubes.
• Clean air vents and air inlet of debris.
• Store your unit and extension cord in a
well ventilated area and covered, if
possible, to prevent dust and dirt accu-
mulation. Do not cover with plastic.
Plastic cannot breathe and may cause
condensation and eventual rust or cor-
rosion.
• Check entire unit for loose screws. Re-
place any damaged, worn, or broken
parts.
7