


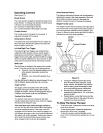
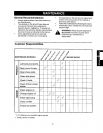

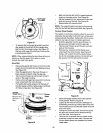
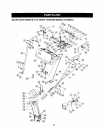

Shift Chute Distance
Lever Control
Drive Auger
Clutch
Upper
Hole
Shift
Lever
Spring
Washer
Flat
Washer
Hak
Clip
Flat
Washer
Rod
Assembly
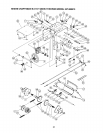
Auger Drive Belts
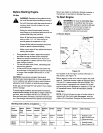
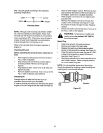
Disconnect the chute crank at the chute
assembly by removing the cotter pin and the flat
washer.
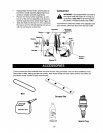
Remove the plastic belt cover on the front of the
engine by removing two self-tapping screws.
See Figure 25.
Self-Tapping
Belt Cover
Figure 24
Insertthe ferrule into the upper hole in the shift
lever from the right side when adjustment is
correct. Secure with the flat washer and the
hairpin clip that you had earlier removed. See
Figure 24.
Check for correct adjustment of the traction
drive control as instructed in the Final
Adjustment section.
Service
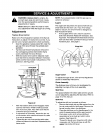
Shave Plate And Skid Shoes
The shave plate and skid shoes on the bottom of the
snow thrower are subject to wear. They should be
checked periodically and replaced when necessary.
To remove skid shoes, remove the two carriage
bolts, belleville washers and hex nuts (on each
side) which attach them to the snow thrower.
Reassemble new skid shoes with the hardware
earlier removed. Make sure to insertthe cupped
sideof the washer against theskid shoe sothat the
skid shoe isadjusted to be level.
To remove shave plate, remove the carriage
bolts, belleville washers and hex nutswhich
attach itto the snow thrower housing.
Reassemble new shave plate, making sure
heads of the carriage bolts are to the inside of
the housing. Tighten securely.
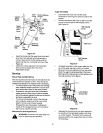
Belt Removal And Replacement
,_. WARNING: Disconnect the spark plug wire
from the spark plug and ground it.
Self-Tapping
Screw
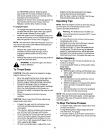
Figure 25
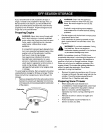
Unthread the bottom of the auger cable from the
top of the cable, leaving the hex nut inplace.
Remove the six lock washers and hex nuts which
attachthe auger housingassembly tothe frame.
See Figure26. (Onlytwo pairs oflock washers and
hex nuts are shown inthe figure.)
Lock Washer
and Hex Nut
Figure 26
Separate the housing from the frame assembly
by standing in the operating position and lifting
up on the handles. The frame and housing will
separate and the rear auger drive belt will come
off the pulleys.
21