


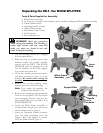


18 DR
4-Ton WOOD SPLITTER Safety & Operating Instructions
Adjusting the Hydraulic Fluid Level
Tools Needed:
Adjustable Wrench
Small Phillips Screwdriver
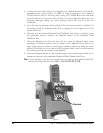
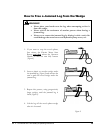
1. Check the hydraulic fluid level by tipping the wood splitter up on the wheels and
motor.
2. Clean the area around the Hydraulic Fluid Fill/Drain Port. See Figure 5 on page 12.
Loosen the Bleed Screw. Then, using the adjustable wrench, unscrew the Dipstick
located in the Hydraulic Fluid Fill/Drain Port.
3. Clean the Dipstick and replace it without screwing down to check the level; it
should be between the two marks on the Dipstick. If the fluid is too high, simply
pour out a little at a time into a suitable container by tilting the wood splitter. If the
fluid is too low, add an AW32 hydraulic fluid, a little at a time until the level falls
between the two marks on the dipstick.
4. Clean the Dipstick and the O-ring seal thoroughly and reinstall being careful not to
damage the threads of the aluminum Hydraulic Fluid Cylinder End Cover.
5. Open the Air Bleed Screw using a small Phillips screwdriver 4 turns and cycle the
ram back and forth 3 or 4 times to purge any air from the hydraulic system (Figure 4
on page 11).
Sharpening the Wedge
Tool Needed:
Fine-Toothed Flat File
Before each splitting session, check the sharpness of the wedge. As required, remove
any burrs or flat spots on the wedge blade using a fine-toothed flat file.
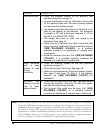
WARNING! When performing any maintenance, you must first unplug the
w
ood splitter from the power source and make sure the hydraulic
system is depressurized and the fluid has cooled. Read the
"Safety Considerations" chapter of this manual before
performing any repairs or maintenance. See page 8.
WARNING! When performing any maintenance, you must first unplug the
wood splitter from the power source and make sure the hydraulic
system is depressurized and the fluid has cooled. Read the
"Safety Considerations" chapter of this manual before
performing any repairs or maintenance.