


Page 6SKU 90282
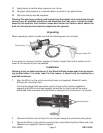
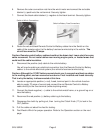
6. Remove the outer connection nuts from the winch motor and connect the red cable
labeled (+) positive to the red terminal. Securely tighten.
7. Connect the black cable labeled (–) negative to the black terminal. Securely tighten.
8. Route the red and black Remote Control-to-Battery cables from the Switch on the
cable of the remote control, to the battery fuse box terminal strip in the vehicle. The
circuit fuse must be 70 amps.
Caution: Remote control battery cables should not be drawn taut. Leave slack for some
cable movement. Do not route cables near moving engine parts, or heated areas that
could melt the cable insulation.
9. Disconnect the positive (red) cable to the vehicle battery.
You will now be making an electrical connection from the Remote Control-to-Battery
cables to the vehicle electrical system (the vehicle’s fuse box terminal strip).
Caution: Although the 12 VDC battery cannot shock you, it can spark and heat up cables
to the melting point, and can cause serious burns if not installed and fused correctly.
That is why the battery is disconnected at this time.
10. Locate an appropriate positive (+ red), fused, terminal point in the vehicle fuse box
able to supply 70 amps of current and connect the red Remote Control-to-Battery
cable directly to the fuse terminal (without splicing wires).
11. Connect the black negative (—) cable to the vehicle metal frame, or a ground lug on or
near the battery.
12. Reconnect the red positive (+) battery cable lug to the battery.
13. Disengage the clutch by pulling out, then turning the Clutch Knob (17) to lock in the
OUT position.
14. Pull the cable out about five feet for testing.
15. Test Electric Winch for proper operation. Refer to the Operation section on the next
page.
Switch to Winch Connections
Switch to Battery Fuse Connections
REV 04/04