


Celestial Photography • 49
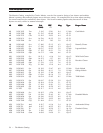
The exposure times listed here should be used as a starting point. Always make
exposures that are longer and shorter than the recommended time. Also, try
bracketing your exposures, taking a few photos at each shutter speed. This will
ensure that you will get a good photo. If using black and white film, try a yellow
filter to reduce the light intensity and to increase contrast.
Keep accurate records of your exposures. This information is useful if you
want to repeat your results or if you want to submit some of your photos to
various astronomy magazines for possible publication!
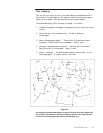
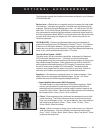
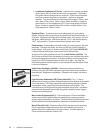
The easiest way to enter the realm of deep-sky, long exposure astrophotography is
via the piggyback method. Piggyback photography is done with a camera and its
normal lens riding on top of the telescope. Through piggyback photography you
can capture entire constellations and record large scale nebulae that are too big for
prime focus photography. Because you are photographing with a low power lens
and guiding with a high power telescope, the margin for error is very large. Small
mistakes made while guiding the telescope will not show up on film. To attach the
camera to the telescope, use the piggyback adapter screw located on the top of the
tube mounting ring (see figure2-1). It will be neccessary to remove the finder
scope bracket before attaching the camera. In order to guide the exposure, you
will need an optional motor drive (#93518 or #93523).
As with any form of deep-sky photography, it should be done from a dark sky
observing site. Light pollution around major urban areas washes out the faint
light of deep-sky objects. You can still practice from less ideal skies.
1. Polar align the telescope (using one of the methods described earlier) and
start the motor drive.
2. Load your camera with slide film, ISO 100 or faster, or print film, ISO 400
or faster!
3. Set the f/ratio of your camera lens so that it is a half stop to one full stop
down from completely open.
4. Set the shutter speed to the “B” setting and focus the lens to the infinity
setting.
5. Locate the area of the sky that you want to photograph and move the
telescope so that it points in that direction.
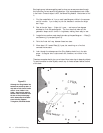
6. Find a suitable guide star in the telescope eyepiece field of view. This is
relatively easy since you can search a wide area without affecting the area
covered by your camera lens. If you do not have an illuminated cross hair
eyepiece for guiding, simply defocus your guide star until it fills most of the
field of view. This makes it easy to detect any drift.
7. Release the shutter using a cable release.
8. Monitor your guide star for the duration of the exposure making the neccessary
corrections needed to keep the star centered.
Piggyback