


2009 Spa Wraps
LTR20091032, Rev. A
Spa Wrap Assembly
www.calspas.com
2
The following will tell you how to assemble your spa
wrap. If you have any questions, problems with material
and/or parts, please contact your local retailer.
NOTE: It is strongly advised that you have a licensed
professional install the foundation for your new spa
wrap. It is imperative that the foundation is level, as
any damage that occurs due to an uneven foundation
is not covered by the warranty.
If you are having a new spa delivered, we recommend
that you determine, prior to its delivery, where your spa
will be placed. For example: if you are going to center
your spa on the concrete slab, take measurements
Tools and Materials
Utility knife 25’ tape measure Cordless drill
100’ extension cord Electric drill Phillips-head drill tips
1/8” pilot hole drill bit 9/16” socket Slotted-head drill tips
Sandpaper (various grades) Redwood stain Wood putty
Gray wash stain Rags 1/2” ratchet and impact drill
1/2” carbide drill bit (masonry bit)
that will enable you to determine where the edges of
the spa will be located. When done, mark the corner
locations. Upon delivery of your new Cal Spa, notify
the installation crew that you have determined where
you want the spa located.
After the spa has been installed and is operating, the
assembly of the your new spa wrap may begin.
Important: This spa wrap is a free-standing unit.
As with any structure, it is critical that all the main
support surface be level. If the main support surface
is not level, then the entire spa and spa wrap will be
misaligned.
Assembly
After your Spa is professionally installed, clear the surrounding area for the installation of your spa wrap. If your
spa is already in place and not a new unit, make sure the area surrounding your spa is suitable for a spa wrap
install. The area (slab or deck area) should be level so the spa wrap ts correctly with the spa unit.
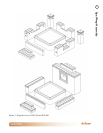
Carefully unpack the components and make sure your new spa wrap parts are arranged properly. Place each of
the four spa wrap sections around the spa as shown in the exploded views (see Figure 1).
Use Figure 2 for assembly of the SW-400, including electrical assembly.
If your unit has a re place, see the instructions in the chapter “Planning for and Using Your Spa Wrap Fireplace
(Model SW-100)”.
Spa Wrap Assembly