


2009 Spa Wraps
LTR20091032, Rev. A
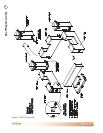
Installing Your Spa Wrap Fireplace
www.calspas.com
9
Testing for Leaks
Perform a leak test at least once each year whether the
gas supply cylinder has been disconnected or not. In
addition, anytime the gas cylinder is connected to the
regulator or any part of the gas system is disconnected
or replaced, conduct a leak test.
As a safety precaution, remember to always leak test
your replace outdoors in a well-ventilated area. Never
smoke or permit sources of ignition in the area while
doing a leak test. Do not use a ame, such as a lighted
match to test for leaks. Use only a leak testing solution
as specied below.
Prepare a leak testing solution of sudsy water by 1.
mixing in a spray bottle half-liquid soap and half
water.
Check and make sure all the control knobs are in 2.
the OFF position.
Turn cylinder valve knob counter clockwise one 3.
turn to open.
Apply leak-testing solution by spraying on joints of 4.
the gas delivery system.
Blowing bubbles in the soap solution indicates 5.
that a leak is present.
Stop a leak by tightening the loose joint or by 6.
replacing the faulty part with a replacement part
recommended by the manufacturer. Do not attempt
to repair the cylinder valve if it should become
damaged. The cylinder must be replaced.
If you are unable to stop a leak, shut off the gas 7.
supply at the cylinder valve. Remove the cylinder
from the replace. Call an authorized gas appliance
service technician or LP gas dealer. Do not use the
appliance until the leak is corrected.
Push in and turn any control knob to release 8.
pressure in the hose and manifold.
Turn off the control knob.9.
Lighting Your Gas Fireplace
Read the safety information above before attempting
to light your replace.
This appliance must be lit by hand. When lighting,
follow these instructions exactly. Before lighting, smell
around the appliance area for gas. Be sure to smell
next to the base of the appliance, because some gas
is heavier than air and will settle on the ground.
Locate the manual gas control valve, located on 1.
the outside of the , two inches from the base of
the . (Look for a bright red knob.)
Place a burning match on top of the burner in 2.
the middle where ports are present. DO NOT
HOLD THE MATCH IN YOUR HAND. For natural
gas appliances, turn on the ON/OFF valve slowly
at the appliance. For LP appliances, turn the valve
on the LP tank counterclockwise all the way and
then turn “ON” the ON/OFF valve slowly at the
appliance.
If the burner does not light before the match goes 3.
out, immediately turn the gas valve to “OFF”.
Wait at least ve minutes to clear out any gas. 4.
Then smell for gas, including the base of the
appliance. If you smell gas, STOP! Follow Safety
Information above. If you don’t smell gas, repeat
Step 2 above.
To Turn Off the Appliance
Turn the ON/OFF valve to the “OFF” position at 1.
the appliance for the natural gas appliance.
For an LP appliance, turn the ON/OFF valve to 2.
the “OFF” position at the appliance and then turn
the valve on the LP tank clockwise to the “OFF”
position.
Do not use this appliance if any part has been •
underwater. Immediately call a qualied service
technician to inspect the appliance, and to replace
any part which has been under water.