


MAINTENANCE
PT5 09/10 Maintenance Section 5-7
© 2010 Alamo Group Inc.
MAINTENANCE
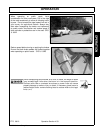
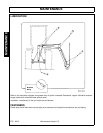
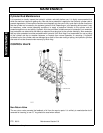
Replacing Spool “O” Rings
Note: Owing to the sharp edges in the design of the spool, failure to carry out the following procedure could
result in damage to the “O” rings resulting in external leakage.
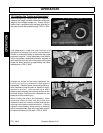
1. Extract the lever pivot and the lever pivot box.
2. Remove the cover at the opposite end of the spool and unscrew the return spring or detent assembly
whichever is necessary.
3. Pull the spool through the block from the handle end, until the “O” ring marked “A” is accessible. Remove
the “O” ring from its groove using a smooth edged hook.
4. Completely remove the spool from the block out of the return spring end.
5. Remove the “O” ring marked “B” and refit the new “O” ring groove “A”.
6. Fit new “O” ring in groove “A”.
7. Push the spool back through from the handle end far enough to reassemble the return spring or detent
assembly plus the cover.
8. Reassemble the lever pivot box, lever and handle to the valve.
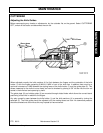
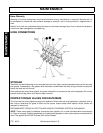
Main Relief Valve
The main relief valve is pressure set at the factory to 1450 PSI (100 Bar) and is non adjustable. A sticking relief
valve will probably cause overheating and/or loss of power. If this is suspected it should be dismantled and
examined for dirt and damage. Undo the large hexagon housing, the relief valve spring, needle and seat can
now be withdrawn. If difficulty is experienced in extracting the seat, remove the non-return valve at the
opposite end of the gallery and drive out with a soft brass drift. Be careful not to damage the copper sealing
washer positioned between the seat and the locating shoulder on the block.
Blow out the valve with compressed air and examine the components for damage. These components are
specifically hardened steel and should only display a seating witness - any further damage will require the
complete valve to be replaced.
Under no circumstances be tempted to add shims into this valve in a misguided attempt to increase the power
of the machine. This could damage the tractor, and may cause personal injury.
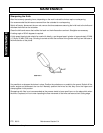
HYDRAULIC HOSES
The condition of all hoses should be checked during routine servicing. Hoses that have been chafed or
damaged on their outer casing should be securely wrapped with waterproof adhesive tape to prevent the metal
braid from rusting. Hoses that have suffered damage to the metal braid should be changed at the earliest
opportunity.
Hose Replacement
1. Replace one hose at a time to avoid the risk of wrong connections.
2. When the hose is screwed to an additional fitting or union, use a second spanner on the union to avoid
breaking both seals.
3. Do not use jointing compound on threads.
4. Avoid twisting the hose. Adjust the hose line to ensure freedom from rubbing or trapping before tightening
the hose end connections.