


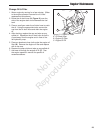

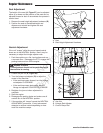

31
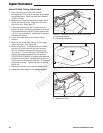
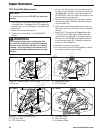
8. With the parking brake disengaged, attempt to pull
the brake hub (D) off of the unit.
• If their is resistance when you remove the brake
hub from the unit, continue with step # 9.
• If their is no resistance when you remove the
brake hub off the unit, place the brake hub back
on the unit and skip to step # 11.
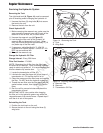
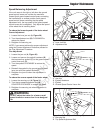
9. Remove the range selector hardware and pivot the
range selector plate until you can insert the range
selector hardware in the next lowest numbered
hole.
10. Re-check the hub for resistance by pulling the
brake up on and off the unit again. If their is
resistance move the range selector hardware in
the next lowest number hole until you can pull the
brake hub on and off without resistance. Place the
hub back on the unit.
11. Tighten the range selector hardware (A) and the
range selector pivot hardware (B),
12. Reinstall the rear wheel.
13. Repeat the process for the other side of the unit.
14. Remove the jack and jack stands from underneath
the machine
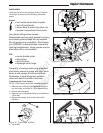
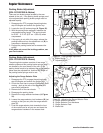
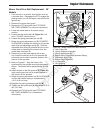
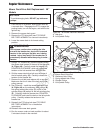
Adjusting the Parking Brake Spring
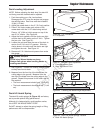
1. Locate the two (2) brake springs (A, Figure 34).
2. With the parking brake engaged, measure the
compressed spring length. The spring should be
2-3/8” (6 cm) when compressed.
3. If the spring length does not equal the
measurement, the spring length will need to be
adjusted.
4. Disengage the parking brake.
5. Loosen the set collar (B) and slide it away from
the back of the parking brake bracket (C).
6. Turn the adjustment nut (D) to compress or
release the spring.
7. Engage the parking brake and re-measure the
spring. Continue this process until the compressed
spring length measures 2-3/8” (6 cm).
8. Position the set collar 1/4” (.64 cm) away from the
parking brake bracket and tighten.
If this does not correct the braking problem, see
your Ferris dealer.
Figure 34. Parking Brake Adjustment
A. Brake Spring
B. Set Collar
C. Parking Brake Bracket
D. Adjustment Nut
A
A
1/4”
(.64 cm)
2-3/8” (6 cm)
B
A
C
D
Regular Maintenance
Not for
Reproduction