


11
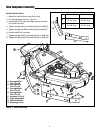
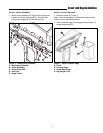
Hitch Plate and Back Plate Installation
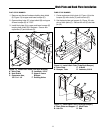
FLAT STYLE BUMBER
1. Remove and discard hardware holding heat shield
(B, Figure 13) to upper and lower bumper (E).
2. Open existing holes (F) in heat shield (B) and upper
& lower bumper (E) to 17/32”.
3. Install hitch plate (A) to upper and lower bumper (E)
keeping heat shield (B) in between. Secure with
capscrews (C) and locknuts (D).
Figure 13. Install Hitch Plate (Flat Style Bumper)
A. Hitch Plate D. Locknuts, 1/2-13
B. Heat Shield E. Upper & Lower
C. Capscrews Hex, Bumper
1/2-13 x 1-1/4 F. Existing Holes
C
B
A
D
D
C
E
F
F
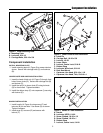
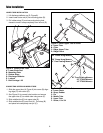
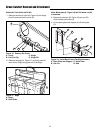
Figure 14. Install Hitch Plate (Tube Style Bumper)
A. Hitch Plate C. U-Bolts
B. Bumper, Tube D. Locknuts, 3/8-16
B
C
A
D
D
D
TUBE STYLE BUMBER
1. Center and secure hitch plate (A, Figure 14) to the
bumper (B) with u-bolts (C) and locknuts (D).
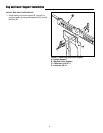
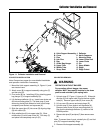
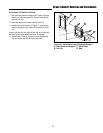
2. Set the back plate and support (A, Figure 15) onto
pins of hitch plate (C). Secure with rod (D) and hair
pin (B).
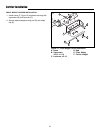
Figure 15. Install Back Plate (Flat Style Bumper)
A. Back Plate and Support C. Hitch Plate
B. Hair Pin D. Rod
A
B
C
D