


2
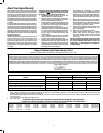
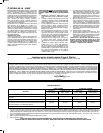
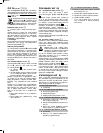
Oil Recommendations (see fig. ©)
Engineshipped fromBriggs &Stratton without
oil.
Before startingengine
, fillwith oil. Do notover-fill.
Use a high qualitydetergent oil classified “For Service
SE, SF, SG,” such as Briggs & Stratton “warranty
certified” SAE 30 oil (see fig.
A
). Use no special
additives with recommended oils. Do not mix oil with
gasoline.
* Air cooled engines run hotter than automotive
engines. U sing multi -viscosity oils (10W-30, etc .)
above 40° F(4° C) will result in high oil
consumption and possible engine damage. Check
oil level more frequently if using these t ypes of oils.
** SAE 30oil, ifused below40° F(4°C), willresult
in hard starting and possible engine bore dam-
age due to inadequate lubrication.
Check oillevel. (Oilcapacity isabout 21oz. or0.6 liter.)
Place engine level and clean around oil fill
.
Remove dipstick, wipe with clean cloth, insert and
tighten down again. Remove dipstick and check oil
level. Oil should be at FULL mark
.
OR
Remove oil filler plug
. Oil should be full to
overflowing
.
If oil is required, add slowly.Tighten dipstick or oil filler
plug firmly before starting engine.
Fuel Recommendations
Use clean, fresh, lead-free, regular, gasoline with a
minimumof77octane.Leadedgasolinemaybe usedif
it is commercially available and if unleaded is unavail-
able. Purchase fuel in quantity that can be usedwithin
30 days. See Storage.
Do not use gasoline which contains Methanol. Do not
mix oil with gasoline.
For engine protection, we recommend using Briggs &
StrattonGasolineAdditive (seefig.
B
)availablefrom
an Authorized Briggs & Stratton Service Dealer.
Check fuel level.
Clean around fuel fill before removing cap to refuel.
Allow space in the fuel tank for fuel expansion.
Before refueling, allow engine to cool 2 min-
utes.
A non-vented fuel cap is required on Model
136200 engines. See any Briggs & Stratton
Authorized Service Dealer, if a replacement
is required.
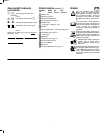
Starting (see figs. ¡¢£)
ALWAYSKEEP HANDSAND FEETCLEAR
OF MOWER BLADE.
Donot useapressurized startingfluid. Start-
ing fluid is flammable. Severe engine dam-
age or fire may occur.
Start, store and fuel equipment in lev el position.
Oil GARD®, if equipped (see fig.
¡)
Oil GARD® light
10
warns of low oil level. If light
flickers when trying to start engine, but engine will not
start, or has s topped andwill not restart, addoil. Fill to
FULL mark on dipstick or to overflowing at oil fill plug.
Before starting (see fig.
¢)
1. Move c hoke controlto CHOKEor START position
.
Note: If engine does not start, remove air c leaner to check
choke. Choke must fully close . If not, see Adjustments .
2. If equipment has separate choke and throttle
controls, m ovethrottle controlto FAST position
.
3. Move stop controlto ON position
, ifequipped.
Rewind starter (see fig.
£)
Grasp rope handle and pull slowly until resist-
ance is felt. Then pull cord rapidly to overcome
compression, prevent kickback and start en-
gine.Repeat if necessary with c hoke inRUN position and
throttle in FAST. When engine starts, operate i n F AST
position.
Electric starter (see fig.
£)
Onenginesequippedwith12voltstartingsystems,turn
key to START position or press starter button .
Repeat if necessary with throttle control in FAST
position.Whenenginestarts,operateinFASTposition.
Note: If equipment manufacturer has supplied battery,
charge it before trying to start engine, as equipment
manufacturer recommends.
Note: Use short starting cycles (15 secs. per min.) to
prolong starter life. Extended cranking can damage
starter motor.
Stopping (see fig. ¤)
Do not move choke control to CHOKE to stop engine.
Backfire or engine damage may occur. Move throttle
controlto IDLEorSLOW position
,if equipped.Then
turn key to OFF or move stop control STOP or OFF
position
.
Adjustments (see fig. ¥)
To preventaccidental starting, removespark
plug wire
and ground it and disconnect
battery at negative terminal, if engine has
electric starting system, before adjusting.
Throttle control adjustments
Remove air cleaner (air cleaner base not shown for
clarity). Loosencasingclamp screw
oncarburetor
or control plate.
Ifchokecontrolisremote,pushbellcrankeitherway
until it just touches washer
.
If choke controlis manual
, move casingand wire in
direction of arrow to end of travel.
Move throttle control to FAST position. Tighten casing
clamp screw. Replace air cleaner.
Fixed governor control
Governor control
has beenset t opermittop no-load
RPM specified by equipment manufacturer. If adjust-
ment is required, consult any Briggs & Stratton
Authorized Service Dealer.
Check stop switch
Move throttle controlto STOP position, ifso equipped.
Governor control lever on carburetor or control plate
must make good contact with stop switch. Check and
readjust if necessary.
Carburetor adjustment
Themanufactureroftheequipment onwhich
this engineis installedspecifies topspeed at
which the engine will be operated. DO NOT
EXCEED this speed.
See an Authorized Briggs & Stratton Dealer for
carburetor adjustment.