


20
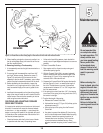
Figure 5-4: To check forward belt tension, take two measure-
ments of the overall length of the boils in the spirng — first
with the clutch bail open, then with the clutch bail closed
against the handlebar.
e. Repeat Steps 2 and 3 to re-measure the length
of the spring. When the second measurement
is between 1/16” -to- 3/16” longer than the first
measurement, retighten the hex nut (C) against the
top of the adjuster (B).
Replacement Belt Information
If the drive belt needs to be replaced, see your local
authorized dealer or refer to the Parts List for ordering
information. Use only a factory-authorized belt as an
“over- the-counter” belt may not perform satisfactorily.
The procedure requires average mechanical ability and
commonly available tools.
FORWARD CLUTCH BAIL ADJUSTMENT
If the Forward Clutch Bail does not function properly, first
check that the forward drive belt is adjusted properly (see
Checking and Adjusting Forward Drive Belt Tension). If
this fails to correct the problem, contact your authorized
dealer for service advice.
CHECKING AND ADJUSTING REVERSE
DRIVE BELT TENSION (Models 643B & 645A
only)
It is important to maintain correct tension on the reverse
drive belt. A loose belt will cause the tines and wheels to
slow down – or stop completely – even though the engine
is running at full speed.
When checking belt tension, also check the belt for
cracks, cuts or frayed edges and replace it as soon as
possible.
• Check belt tension after the first two hours of break-in
operation and after every 10 operating hours.
To Check Reverse Belt Tension:
1. Stop engine, wait for all parts to stop moving and
disconnect spark plug wire.
2. Remove screw in plastic belt cover and slide belt
cover (which is attached to forward clutch cable) out
of the way.
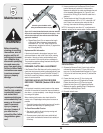
3. Have an assistant pull the Reverse Clutch Control
knob all the way out and hold it in that position.
Measure the length of the cable wire between the end
of the threaded cable adjuster (A, Figure 5-5) and
the end of the Z-fitting (B) to which the cable wire is
attached.
4. The belt tension is ideal if the cable wire length
measures between 1/8” to 1/4”. If it is less than 1/8”
(and if there is no reverse action when the tiller is
running), then make the following adjustments
NOTE: If the length is more than 1/4”, no adjustment is
needed—as long as the reverse action functions properly.
Figure 5-5: Measure cable wire length to check for correct
reverse belt tension.
.
5. Release the Reverse Clutch Control knob.and then
unthread the inner jam nut (C, Figure 5-6) one to
two turns. Pull the threaded cable adjuster (A, Figure
5-6) to the left until the inner jam nut (C) touches the
bracket.
6. Prevent the inner jam nut (C) from turning and
tighten the outer jam nut (D) against the bracket.
Prevent the outer jam nut (D) from turning and
tighten the inner jam nut (C) against the bracket.
7. Measure the gap by repeating Step 3. Readjust as
needed by repeating Steps 5 and 6.
8. Reinstall the belt cover.
Figure 5-6: Move threaded adjuster (A) to left to increase
belt tension..
5
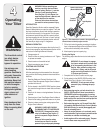
WARNING
Before inspecting,
cleaning or servicing
the machine, shut off
engine, wait for all
moving parts to come
to a complete stop,
disconnect spark plug
wire and move wire
away from spark plug.
Failure to follow these
instructions can result
in serious personal
injury or property
damage.
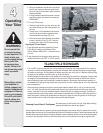
Loading and unloading
the tiller into a vehicle
is potentially hazard-
ous and we don’t
recommend doing so
unless absolutely nec-
essary, as this could
result in personal
injury or property
damage. However, if
you must load or
unload the tiller, follow
the guidelines given
next.
Maintenance