


12
Tips and Techniques
• Adjust engine speed to suit the tilling conditions. Remember
that the rotating tines help to pull the machine forward. Use
slower speeds and a shallow depth setting when learning to
use the unit and whenever you are tilling on hard, rough or
uneven ground.
• The amount of pressure applied to the handlebars helps to
control tilling depth. Depending upon soil firmness and tex-
ture, you may have to push down or lift up on the handlebars
to achieve the correct tilling depth.
• Set the handlebars at a height which provides maximum con-
trol at all times. The machine should feel comfortable and
well-balanced.
• If the machine stays and tills in one spot, try swinging the
handlebars from side to side to start it moving forward again.
Tilling Depths
• Do not try to till too deeply in the first pass through sod or
very hard ground. If the machine jumps or bucks, use a shal-
lower depth setting and reduce the engine speed. With each
succeeding pass, till more deeply.
• Apply downward pressure on the handlebars for shallower till-
ing. Lift the handlebars to dig more deeply.
• For easier tilling, water very hard soil a few days before tilling.
Avoid soggy or wet soil. Wait a day or two after heavy rain for
the ground to dry.
Cultivating
• The machine is well-suited for cultivating (shallow tilling that
disrupts weeds and aerates the upper crust of soil).
• Shallow tilling is very important! Do not till deeper than 1"-2"
to avoid injuring nearby plant roots. Cultivate often, so that
weeds do not grow large and cause needless tangling in the
tines.
• With careful planning, you can space the seed rows far
enough apart to allow sufficient room for the machine to culti-
vate after the plants have grown.
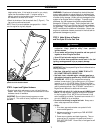
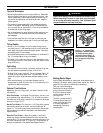
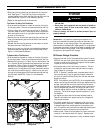
Optional Tine Positions
Depending upon the tilling project, you have a choice of three
tine patterns:
Wide Tine Pattern – As shipped from the factory, the unit is set
up for general tilling and cultivating. This 10" wide tine pattern
(the maximum tilling width) uses all four tine sections arranged
as shown in Figure 12 “A”.
Narrow Tine Pattern – For a narrow, 4-1/2" tilling width, remove
the outside tine section on the left- and right-sides (see “B”,
Figure 12). This width is particularly well-suited for flower beds.
The tine removal procedure is explained in the Maintenance/
Repairs Section.
Stony Soil Tine Pattern – When tilling deeply in stony soil,
stones may become jammed between the inner tines and the
machine hood. To minimize jamming, swap the positions of the
two inner tine sections (see “C”, Figure 12). The procedure for
doing so is explained in the Maintenance/Repairs Section.
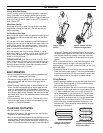
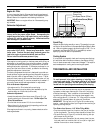
Making Border Edges
Use the Edger Attachment to make clean, sharp edges next to
walkways, driveways, paths, planted areas, patios, etc. Refer to
page 8 for instructions on attaching this accessory.
Take your time when edging.
Decide how far away the edge is
going to be from the walk or
drive, then slowly proceed
using the walk or drive as
your sight line.
The built-in maneuverability
of the equipment helps you
create a near-perfect circle,
or to easily negotiate a
meandering or abruptly-
changing path.
OPERATION
Figure 12: “A” shows all four
tine gangs in standard position;
“B” shows two outer gangs
removed for narrow tilling; “C”
shows the two inner gangs have
been swapped for stony tilling
conditions.
A
B
C
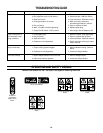
Figure 13
Contact with rotating tines will cause serious personal injury.
Before attempting to remove or clean tines, stop the engine,
let all moving parts stop completely, then disconnect spark
plug wire and move wire away from plug.
WARNING