


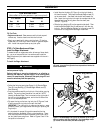


11
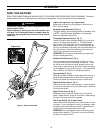
Priming When Cold Starting:
Use this priming method to start the engine after it has been
sitting or has been in brief storage, and has fuel in the tank.
Use the Standard-Volume Priming Position (Figure 6) and push
in top of primer bulb two (2) times for above 55
0
F, or three (3)
times if below 55
0
F.
When Warm Starting:
Do not use the primer to restart the engine after it has been
stopped after running, still has fuel in the tank, and has not
cooled completely.
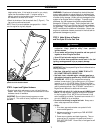
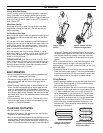
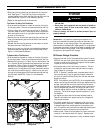
Pull Out Recoil Start Rope:
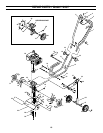
After priming the engine (if required), assume the starting posi-
tion, keeping your feet positioned safely away from the tines.
See Figure 8.
Put one hand on the upper handlebar to stabilize the machine.
Use the other hand to pull out the recoil start rope, slowly, until
it pulls slightly harder. Let rope rewind slowly. Then, with a
quick arm motion, pull the rope all the way out, up to ten (10)
times. Let the start rope rewind slowly.
Allow the engine to warm up for several seconds. If engine
either fails to start or to continue running, push in primer bulb
two (2) times. Grasp starter rope and pull with a rapid, full
stroke, up to ten (10) times.
TROUBLESHOOTING: Push the primer bulb in two (2) more
times. Using a rapid full stroke, pull out the starting rope up to
ten (10) times. If engine still does not start, wait 15 minutes.
Do not prime engine further. Grasp start rope and pull with a
rapid, full stroke up to ten (10) times.
BASIC OPERATION
• Use your machine for busting sod, preparing seedbeds and
for cultivating in gardens and flower beds.
• The machine is easy to operate, but it is important that you
start out slowly and read this Section thoroughly before
putting it to use.
• Please remember that tilling depth is determined by soil con-
ditions, the depth adjustment setting, engine speed and the
amount of pressure applied to the handlebars. With experi-
ence, you will find the right combinations for a variety of tilling
and cultivating applications. Generally, the machine provides
best results when the soil has moderate moisture content and
a granular texture.
• Let the machine do most of the work. The tines will pull the
machine forward, letting you adjust forward speed by press-
ing down or lifting the handlebars.
TILLING AND CULTIVATING
• Roll the machine to the work area.
• Adjust the tilling depth to the desired position (see Pre-Start
Preparation on the previous page).
• Start the engine (see Stopping and Starting the Engine on the
previous page). Assume the operator’s position behind the
handlebars, facing forward toward the engine. Using the han-
dlebar, tilt the machine backward enough to raise the tines off
the ground. Squeeze and release the Engine Throttle Lever –
the engine should speed up and then return to idle speed. At
idle, the tines should stop rotating or they may rotate very
slowly. Lowering them back to the ground should stop any
rotation.
NOTE: If the tines continue to rotate when the engine is idling,
either the idle speed is too high or the centrifugal clutch is
malfunctioning. If this occurs, contact the Factory or your local
authorized dealer.
• Squeeze the Engine Throttle Lever to start the tines rotating.
Lower the tines to begin digging. Firmly hold the handlebars
to prevent the machine from moving forward too quickly and
to allow enough time for the tines to dig deeply enough.
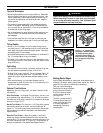
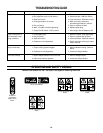
Tilling Patterns
• When preparing a seedbed, go over the same path twice in the
first row, then overlap one-half (1/2) the machine width on
each succeeding pass (Figure 10).
• After going up and down the rows in one direction, make sec-
ond passes at a right angle across the original passes (Figure
11). Again, overlap each pass to thoroughly pulverize the
entire seedbed area. In very hard ground, it may take three
(3) or four (4) passes before the desired depth is achieved.
• If your garden is not wide enough to till lengthwise and then
crosswise, then first overlap by one-half (1/2) the machine
width, followed by successive passes at one-quarter (1/4)
machine width. This overlapping method assures thorough
breaking-up of the ground.
OPERATION
Figure 8: Starting
position.
Figure 10: Use an overlap
technique on every pass.
Figure 11: Make a second set
of passes at a right angle over
the first set of passes.
Figure 9: Assume operator’s
position once engine starts.