


6
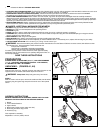
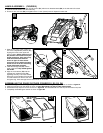
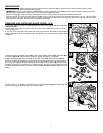
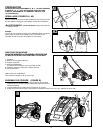
WHEEL HEIGHT ADJUSTMENT (1-1/4 IN. (32mm)
TO 3-1/2 IN. (89mm) FIGURE E
NOTE: Certain types of grass or grass conditions may require varying the
height of the mower deck.
1. Before making any adjustments, turn mower off, wait for blade to stop,
and unplug mower.
2. Your mower features the Black & Decker single lever wheel height
adjust system. This system will adjust all four wheels at the same time.
Mower adjusts from 1-1/4 in. (32 mm) to 3-1/2 in. (89 mm) with six
increments which are marked on the mower.
3. Place your left hand on the height adjust handle E1 and your right
hand on the lower part of the main handle E2.
4. Pull height adjust handle (E1) away from mower, and re-set in the
desired height adjust position. Rotating the height adjust handle towards
the front of the mower lowers the cutting height, and rotating towards the
rear raises the cutting height.
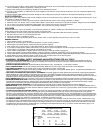
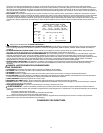
RECOMMENDED APPROXIMATE CUTTING HEIGHT
The cutting height should be in the higher recommendation for warmer weather, lower for shade areas and for the last mow before winter. Follow
the 1/3 rule, never cut off more than 1/3 of the total height of the grass. If lawn is too high to practice this rule, raise the cut height before mowing
and then lower to desired height and mow again in a day or so.
OPERATING INSTRUCTIONS
NOTE: A mower is a major appliance and should not be operated simultaneously with
other major appliances on the same house circuit.
WARNING: Make sure that other persons and pets are at least 100 feet (30.48 m)
away.
Remove all rocks, sticks, wire, toys, bones, and other debris or items which might be
thrown by the rotating blade.
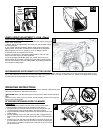
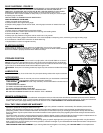
ATTACHING EXTENSION CORD TO MOWER
(FIGURE F)
DO NOT connect the extension cord to power source until you have
finished reading this manual and you are ready to start mowing.
1. The extension cord must be polarized and will only plug in one way,
orient the wide slot with the wide blade in the switch housing.
2. Loop the extension cord (F1) and push the loop up through the hole in the
switch housing.
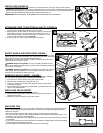
3. Pull the extension cord on the side of the loop that is plugged into the
switch housing and remove all the slack in this section of the extension
cord.
4. Place the loop over the strain relief tab (F2) on the switch housing and
pull the extension cord so the loop draws down around the strain relief
tab as shown in the detail. Double check to see that you did not loosen
the extension cord.
1
2
E
CLIP
PINCE
PINZA
D3
D4
F
1
2